Oct

01

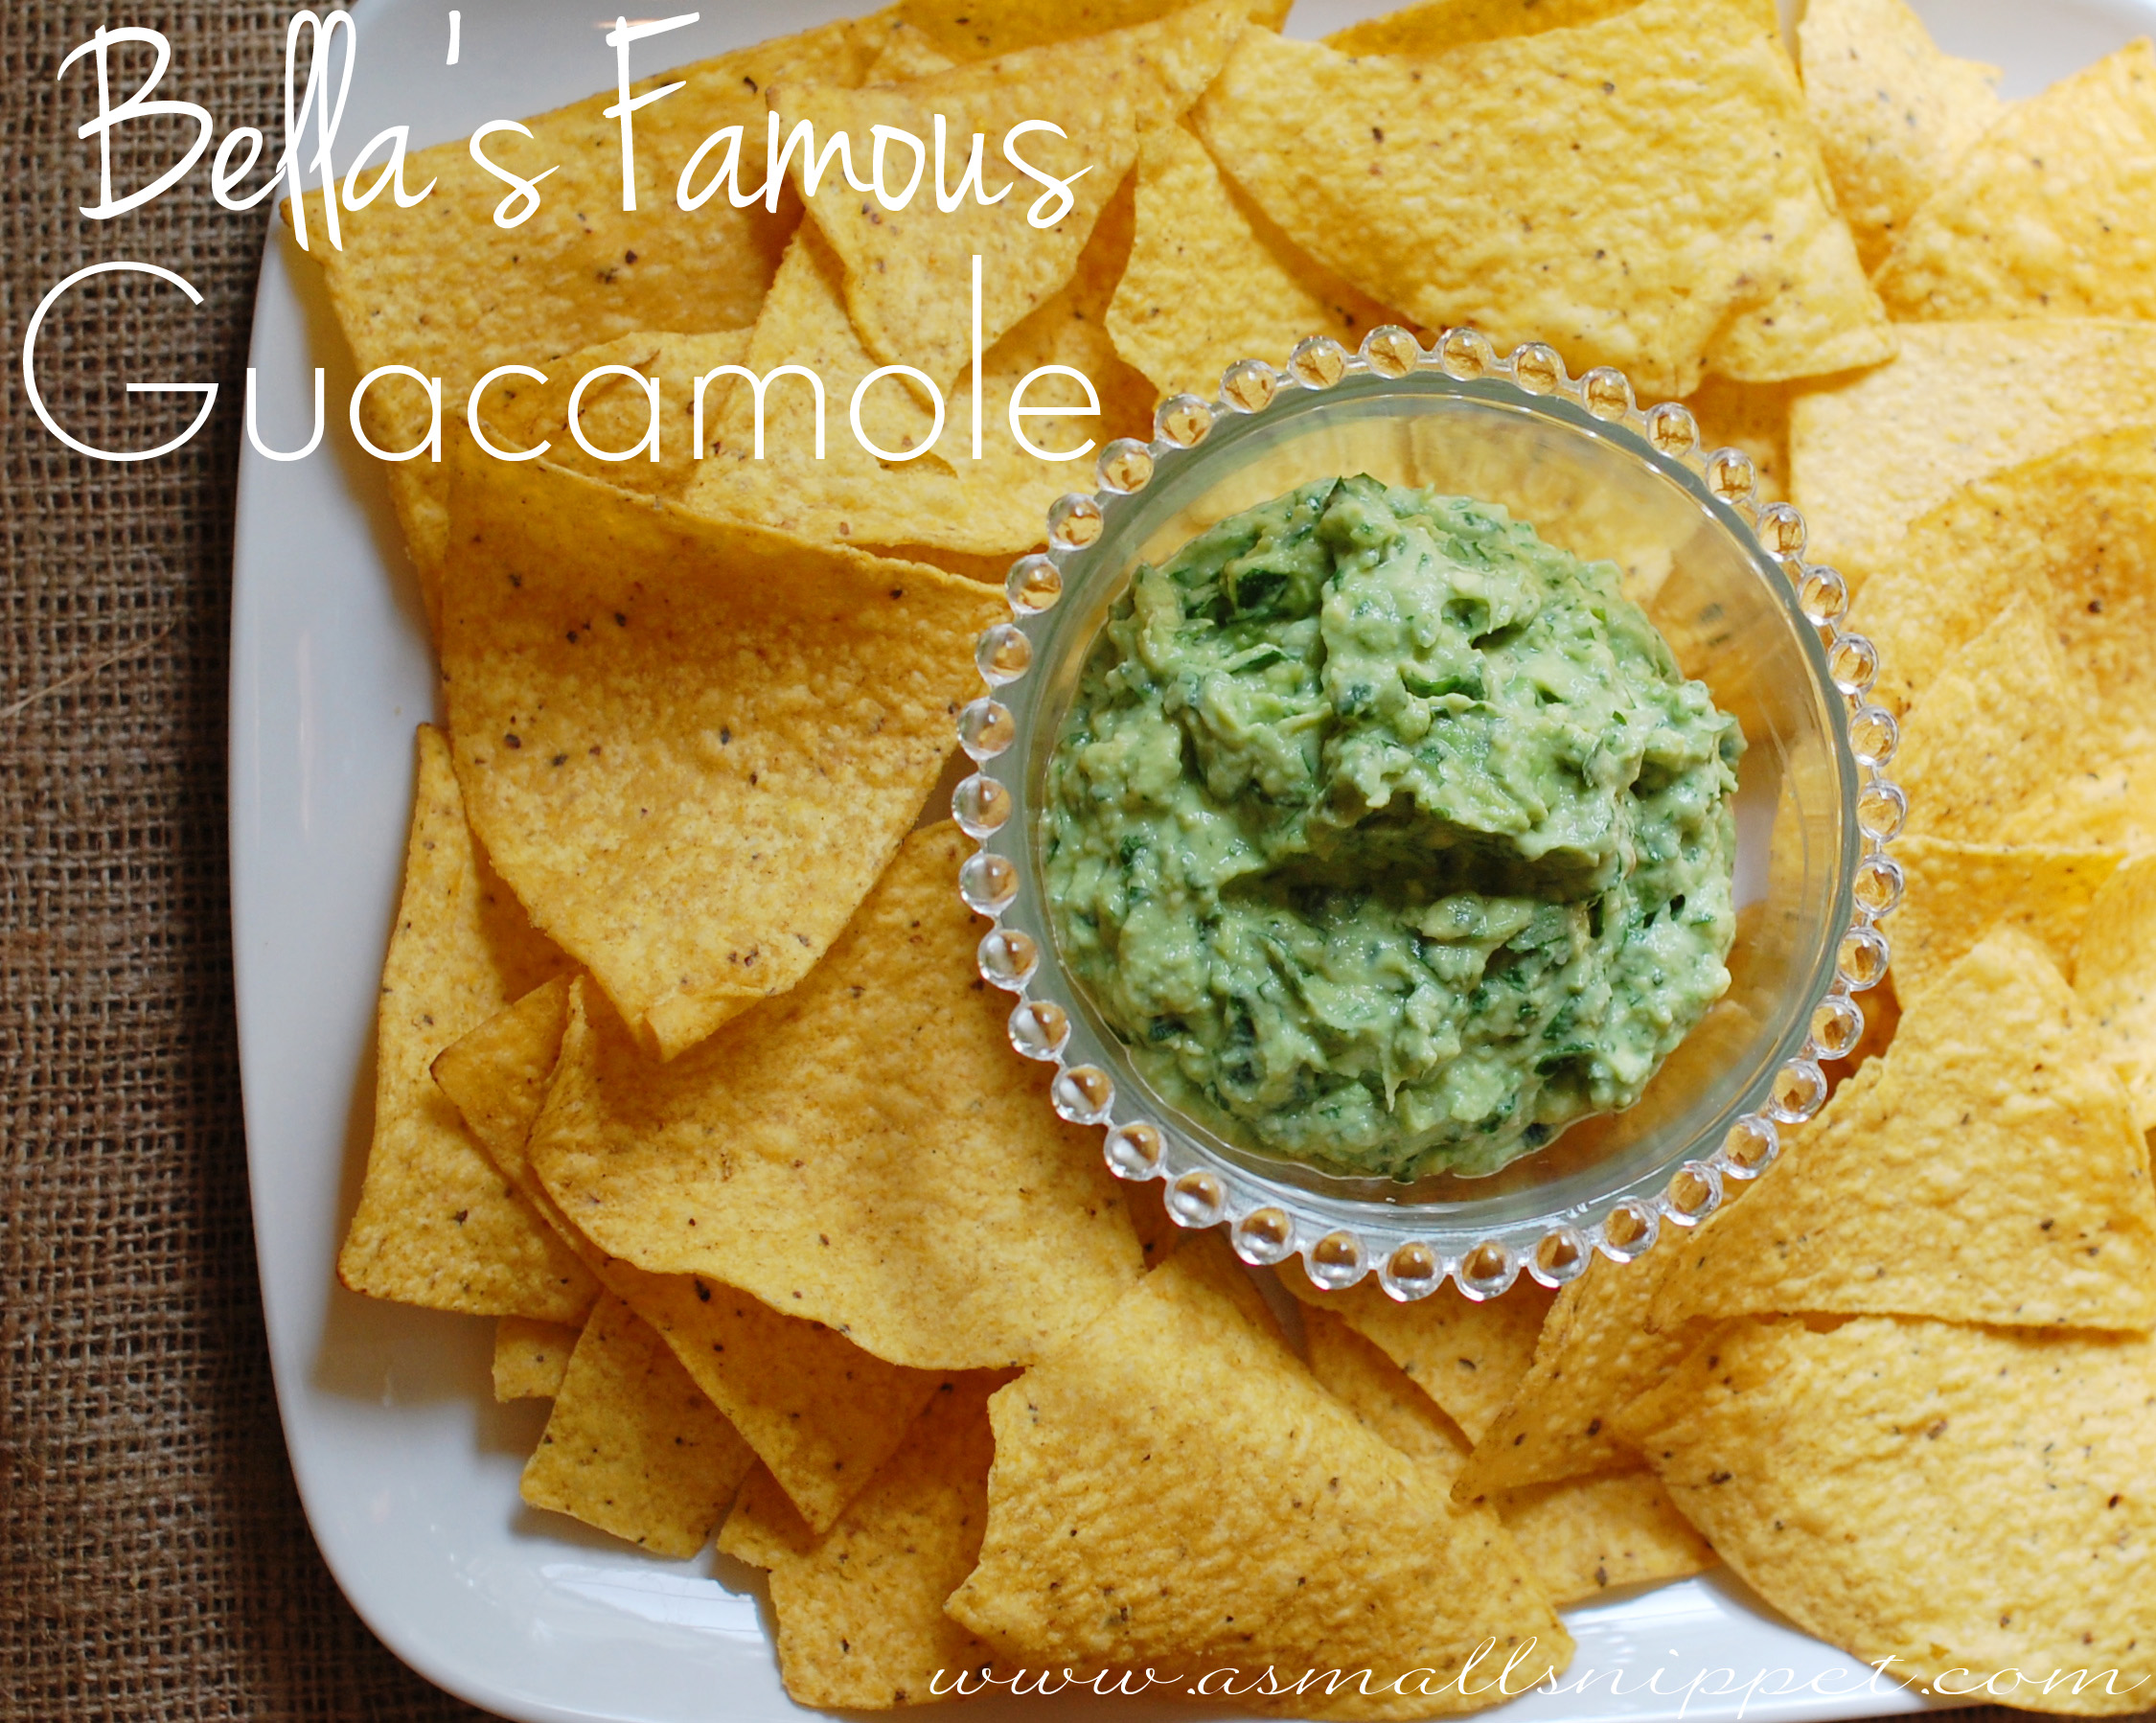
Bella’s Guacamole Recipe

Bella has been very interested in helping out in the kitchen lately, and has even perfected her own Guacamole Recipe, that has become quite the hit around here.  so i thought i’d share it with you!

DSC_0502

i know that there are a gazillion recipes for guacamole out there, and besides, its one of those things you are just supposed to know how to make.  but if you are like me, i’ve had to teach myself all the basics, so even recipes like this that seem to be no-brainers, have taken me time to get just right!  i think this one is by far our favorite combination.  and its fairly simple for Bella to do herself, with minimal help from me (i mainly just cut the avocados.  besides that, she can pretty much do it herself, which she LOVES!)

i’ve made you a printable recipe card at the bottom of the post (and there’s even a little video of Bella explaining her recipe if you keep reading!), but here’s the visual rundown:

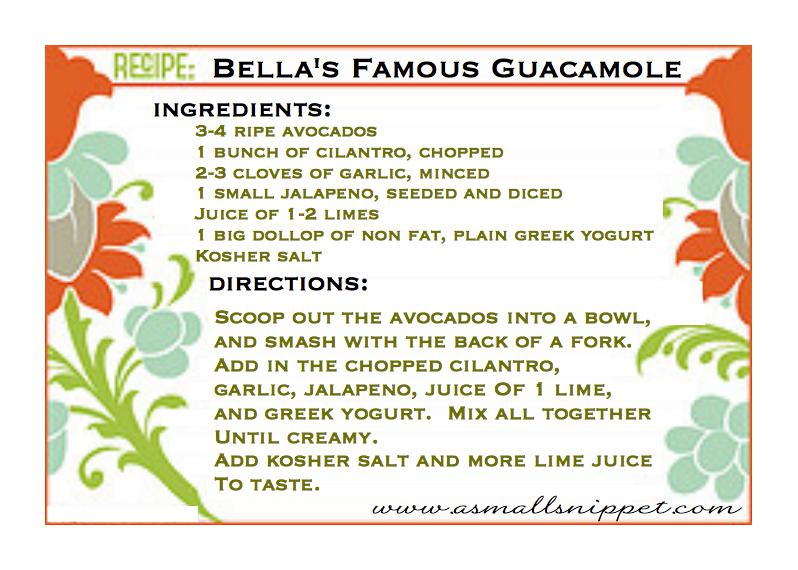
here are the ingredients:
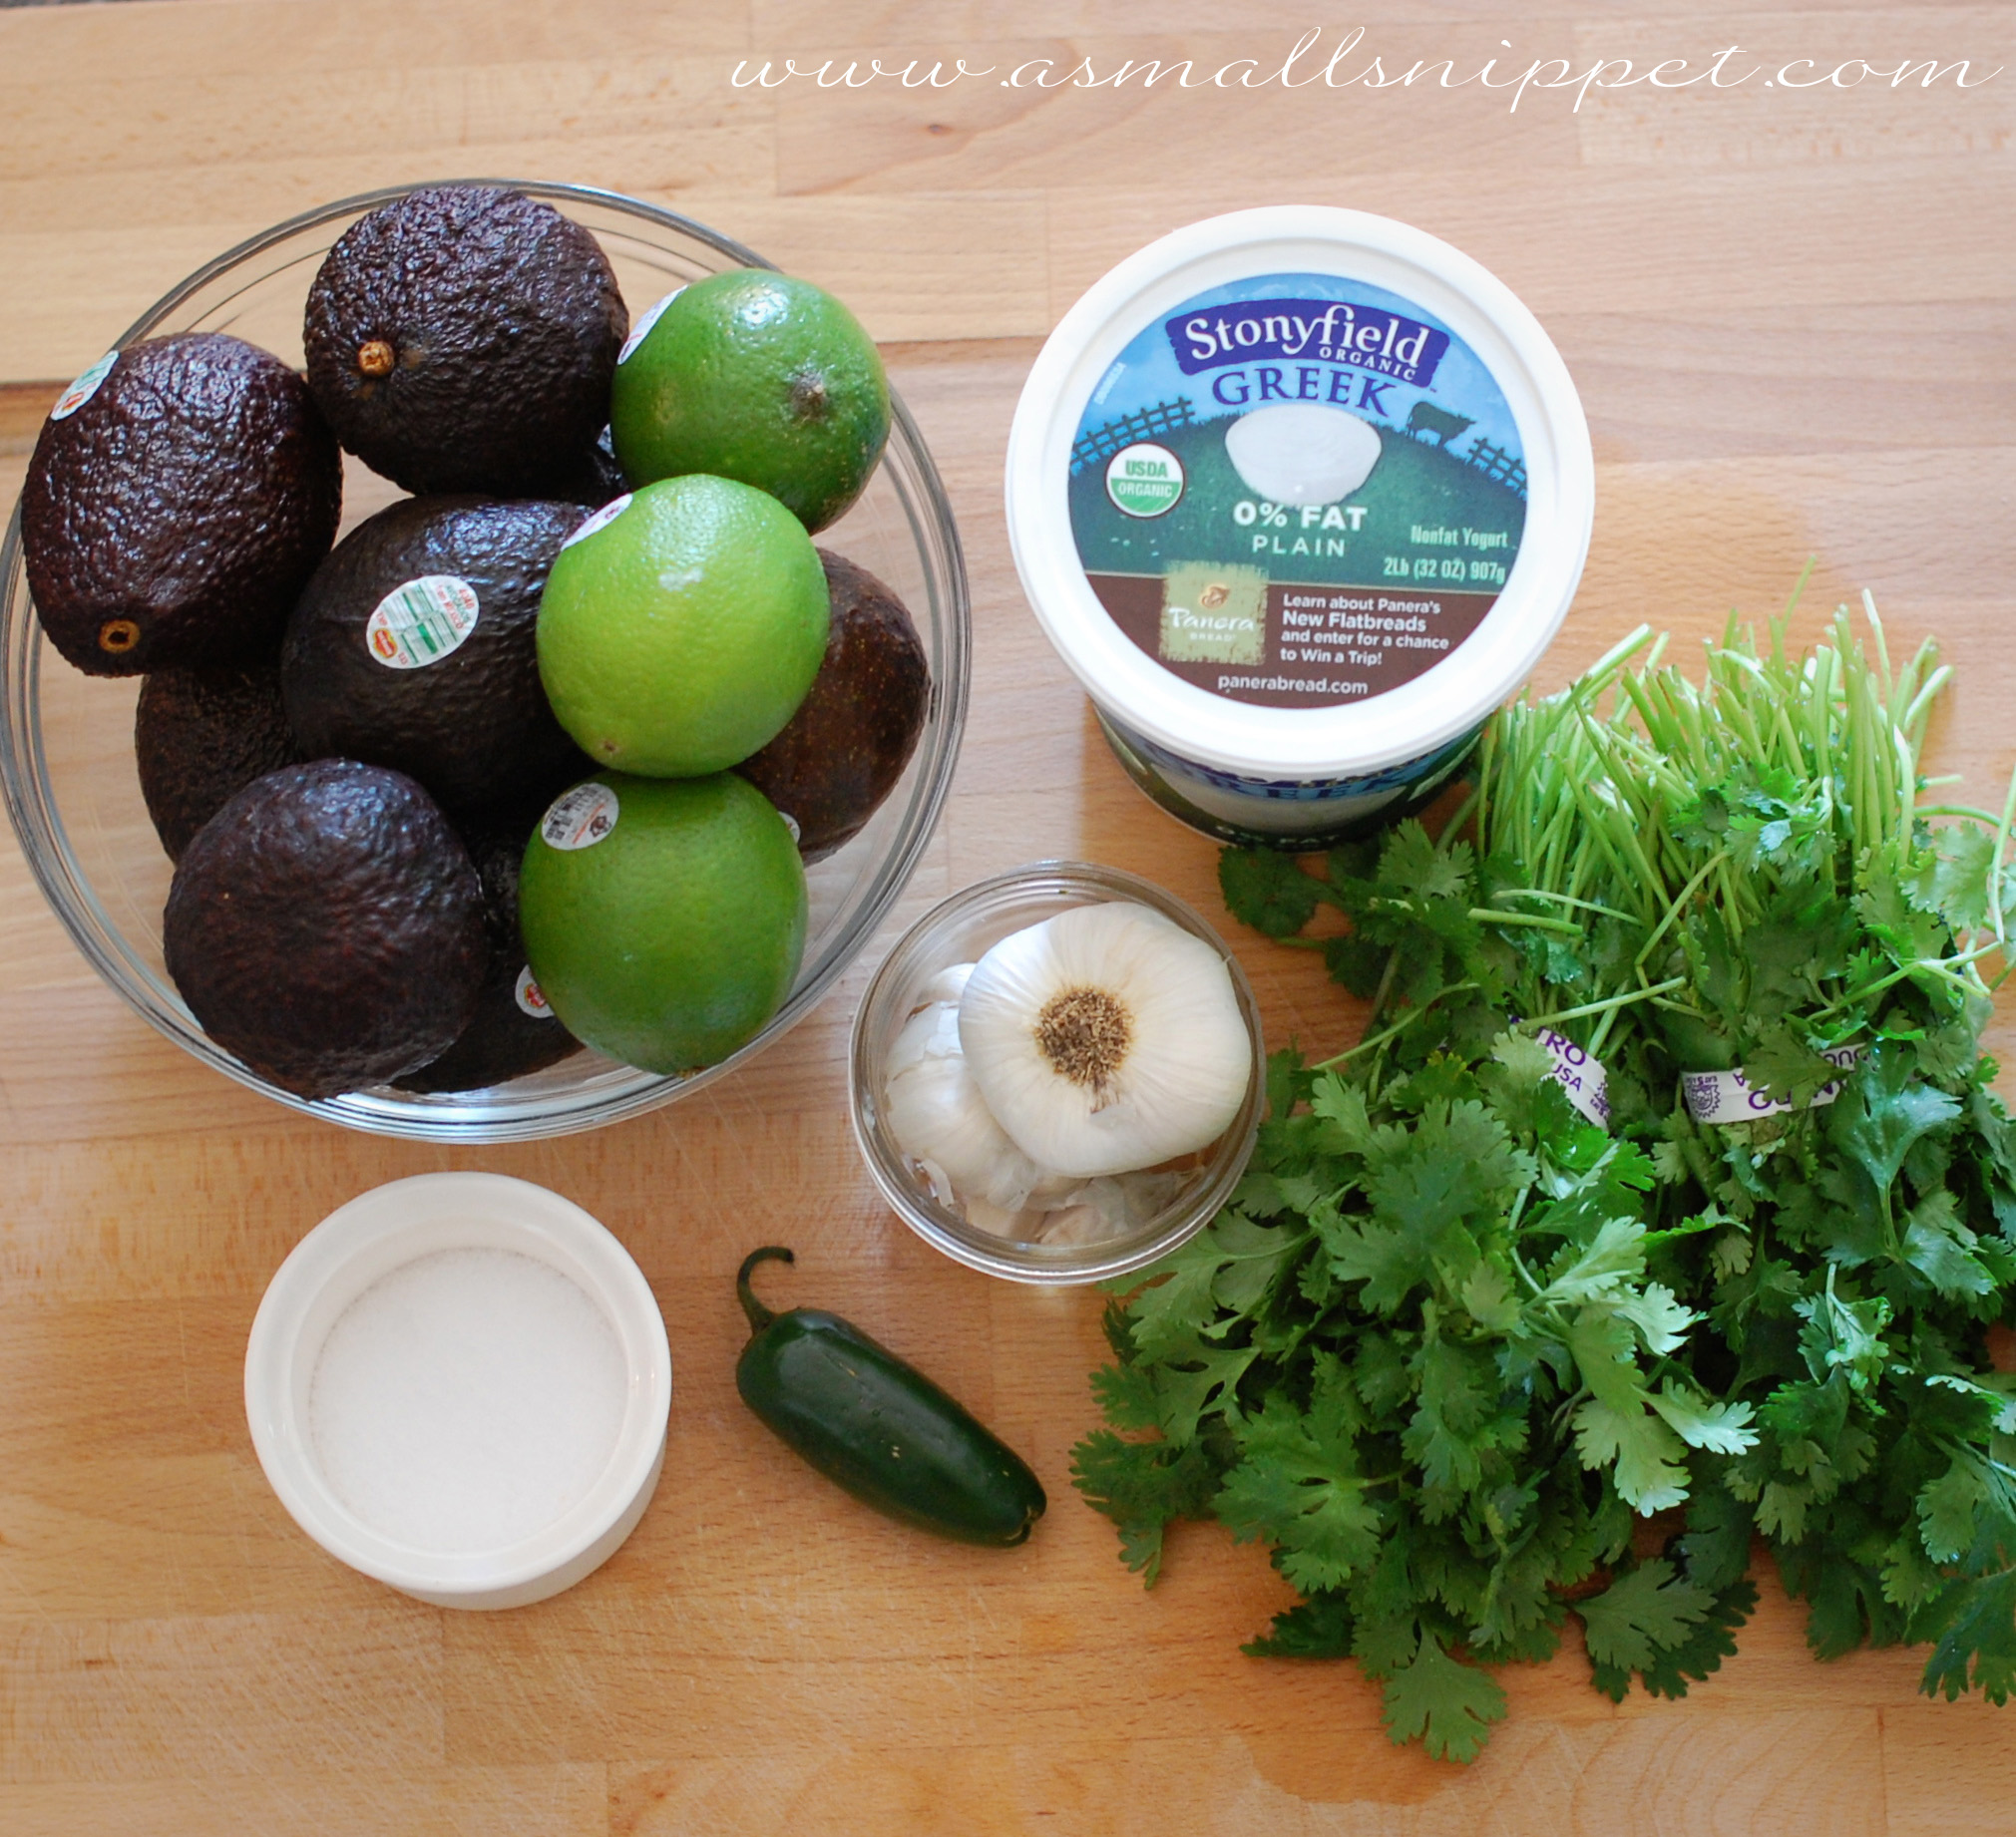
guac

4 ripe avocados
1 big bunch of cilantro, chopped
3-4 cloves of garlic, minced
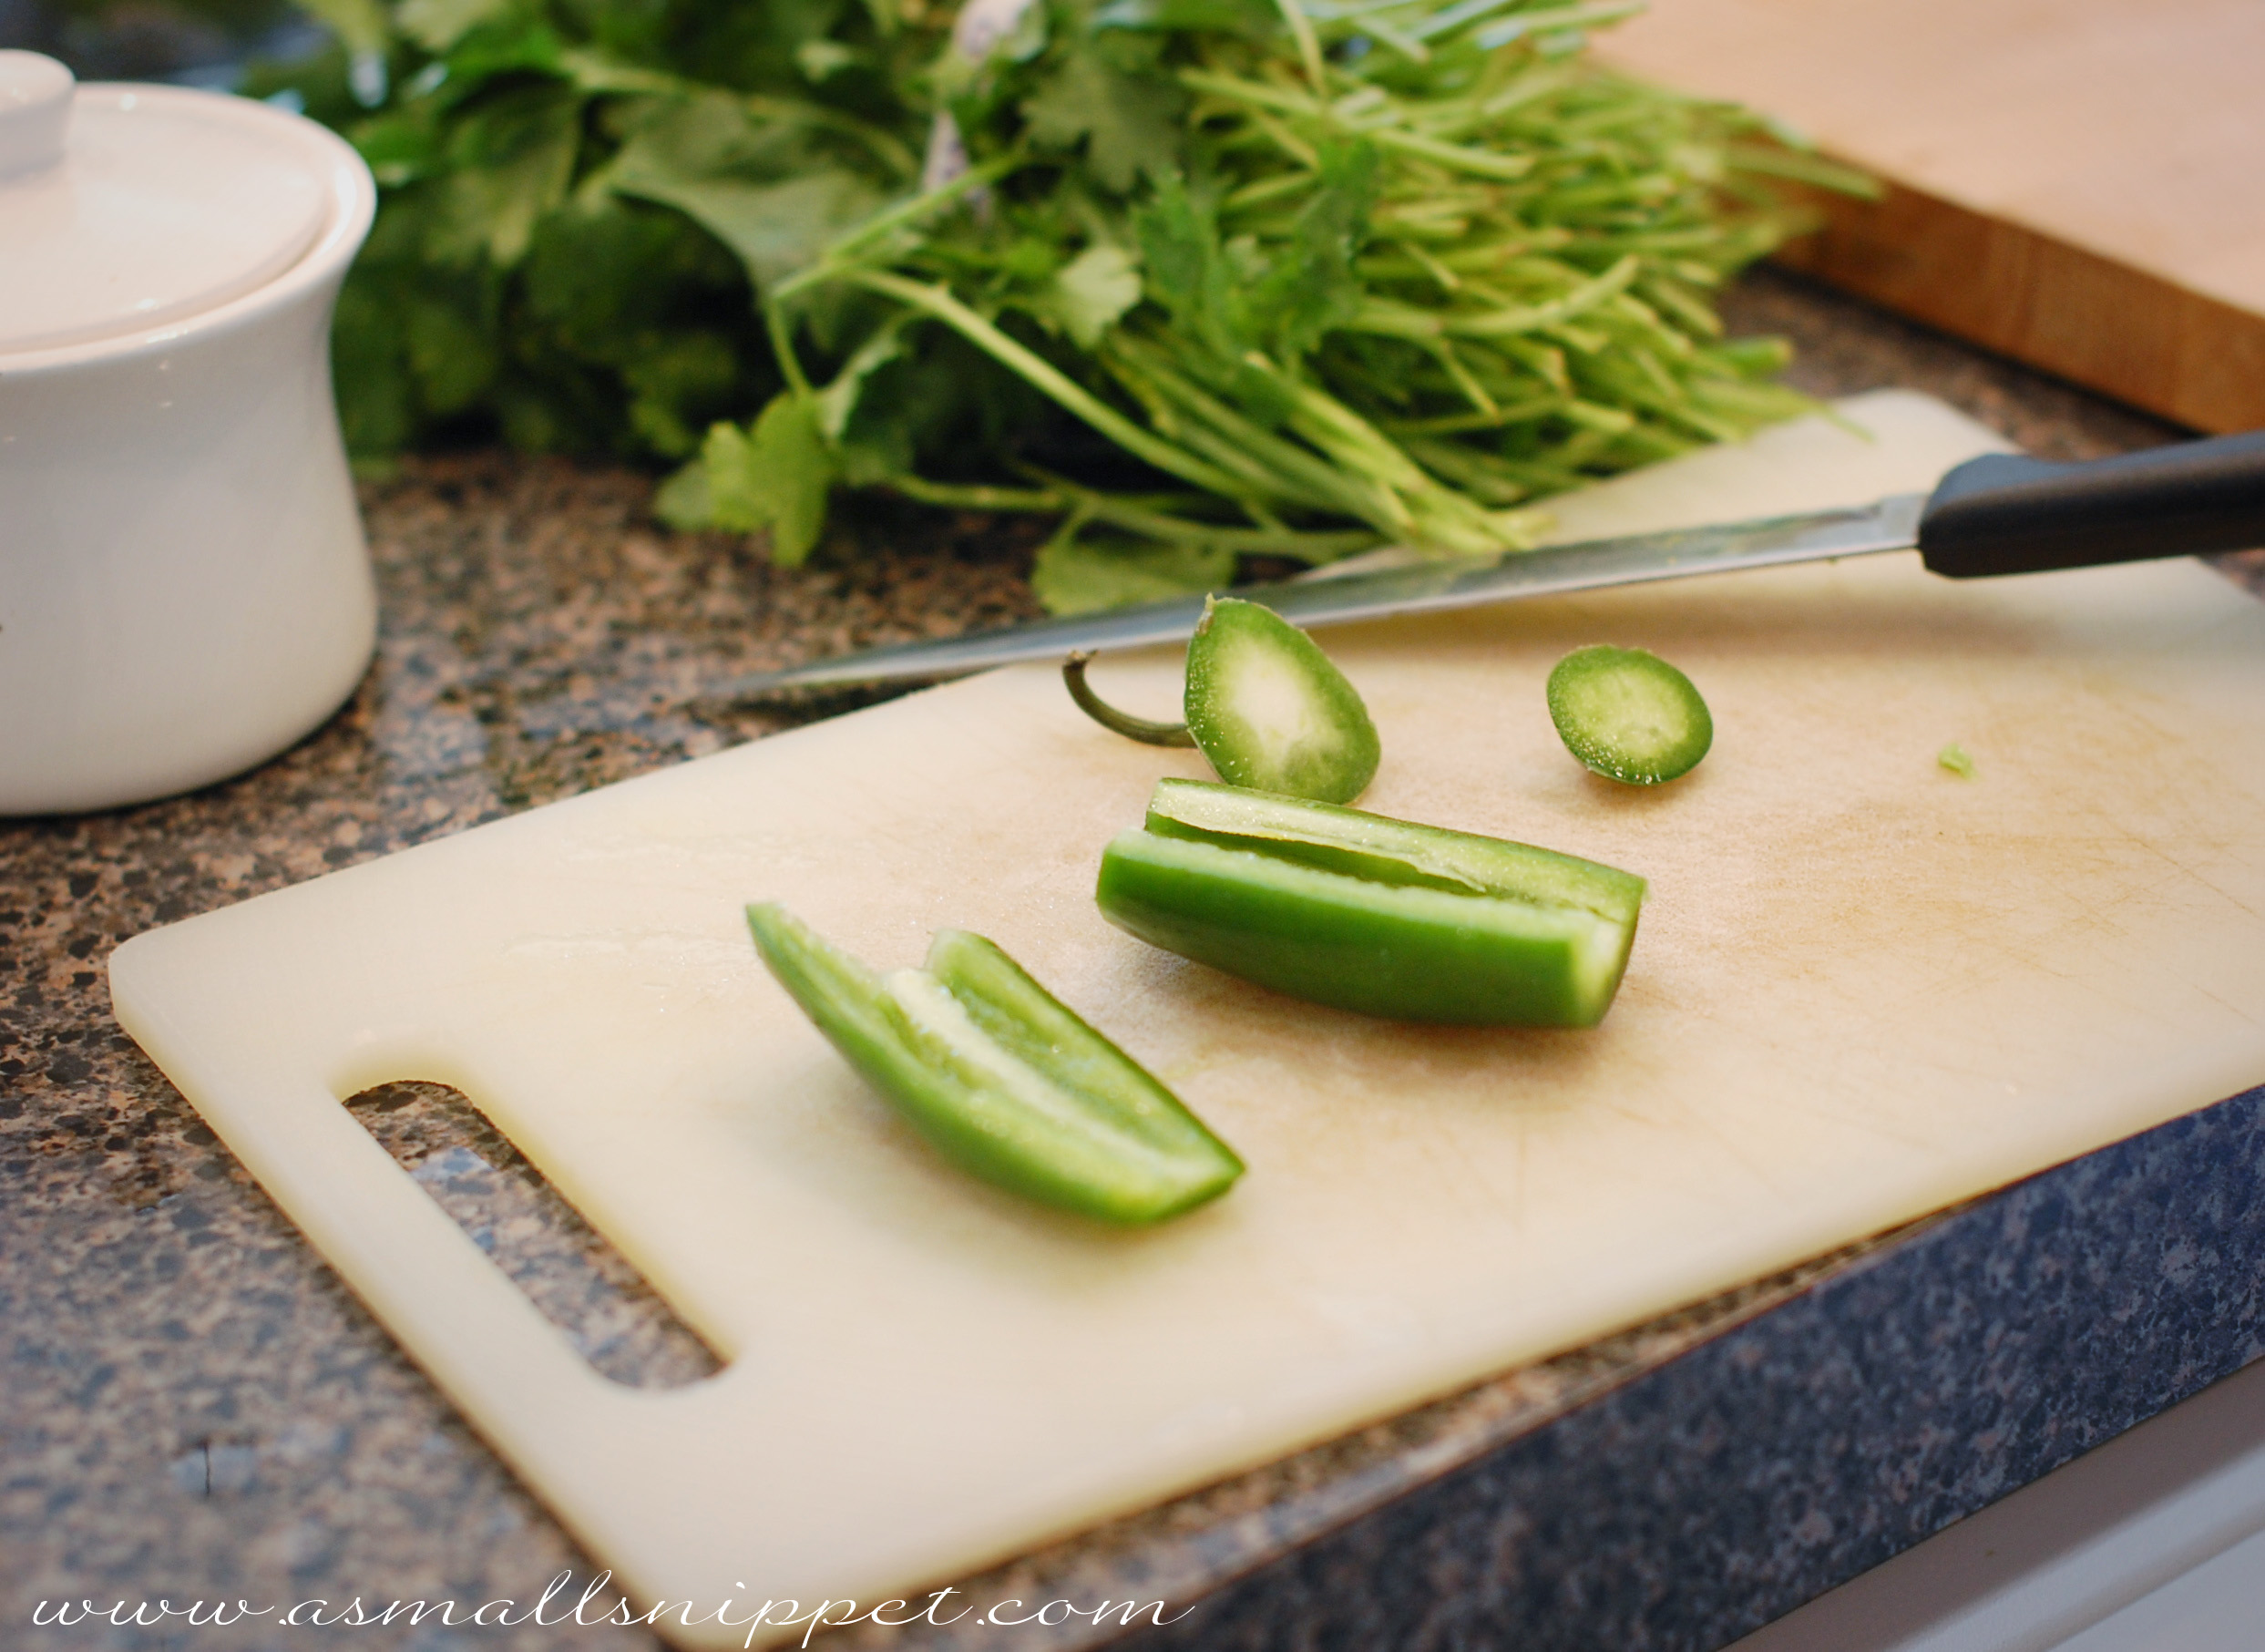
1 small jalapeño, seeded and minced
juice of 1-2 limes
1 big ol’ dollop of non-fat, plain Greek Yogurt
kosher salt to taste

first off, let me tell you about a few of our FAVORITE kitchen tools, that make this recipe in particular super quick. (i’m not getting compensated for mentioning these…i just really love these tools, and think every kitchen would benefit from having them!)

DSC_0208 copy
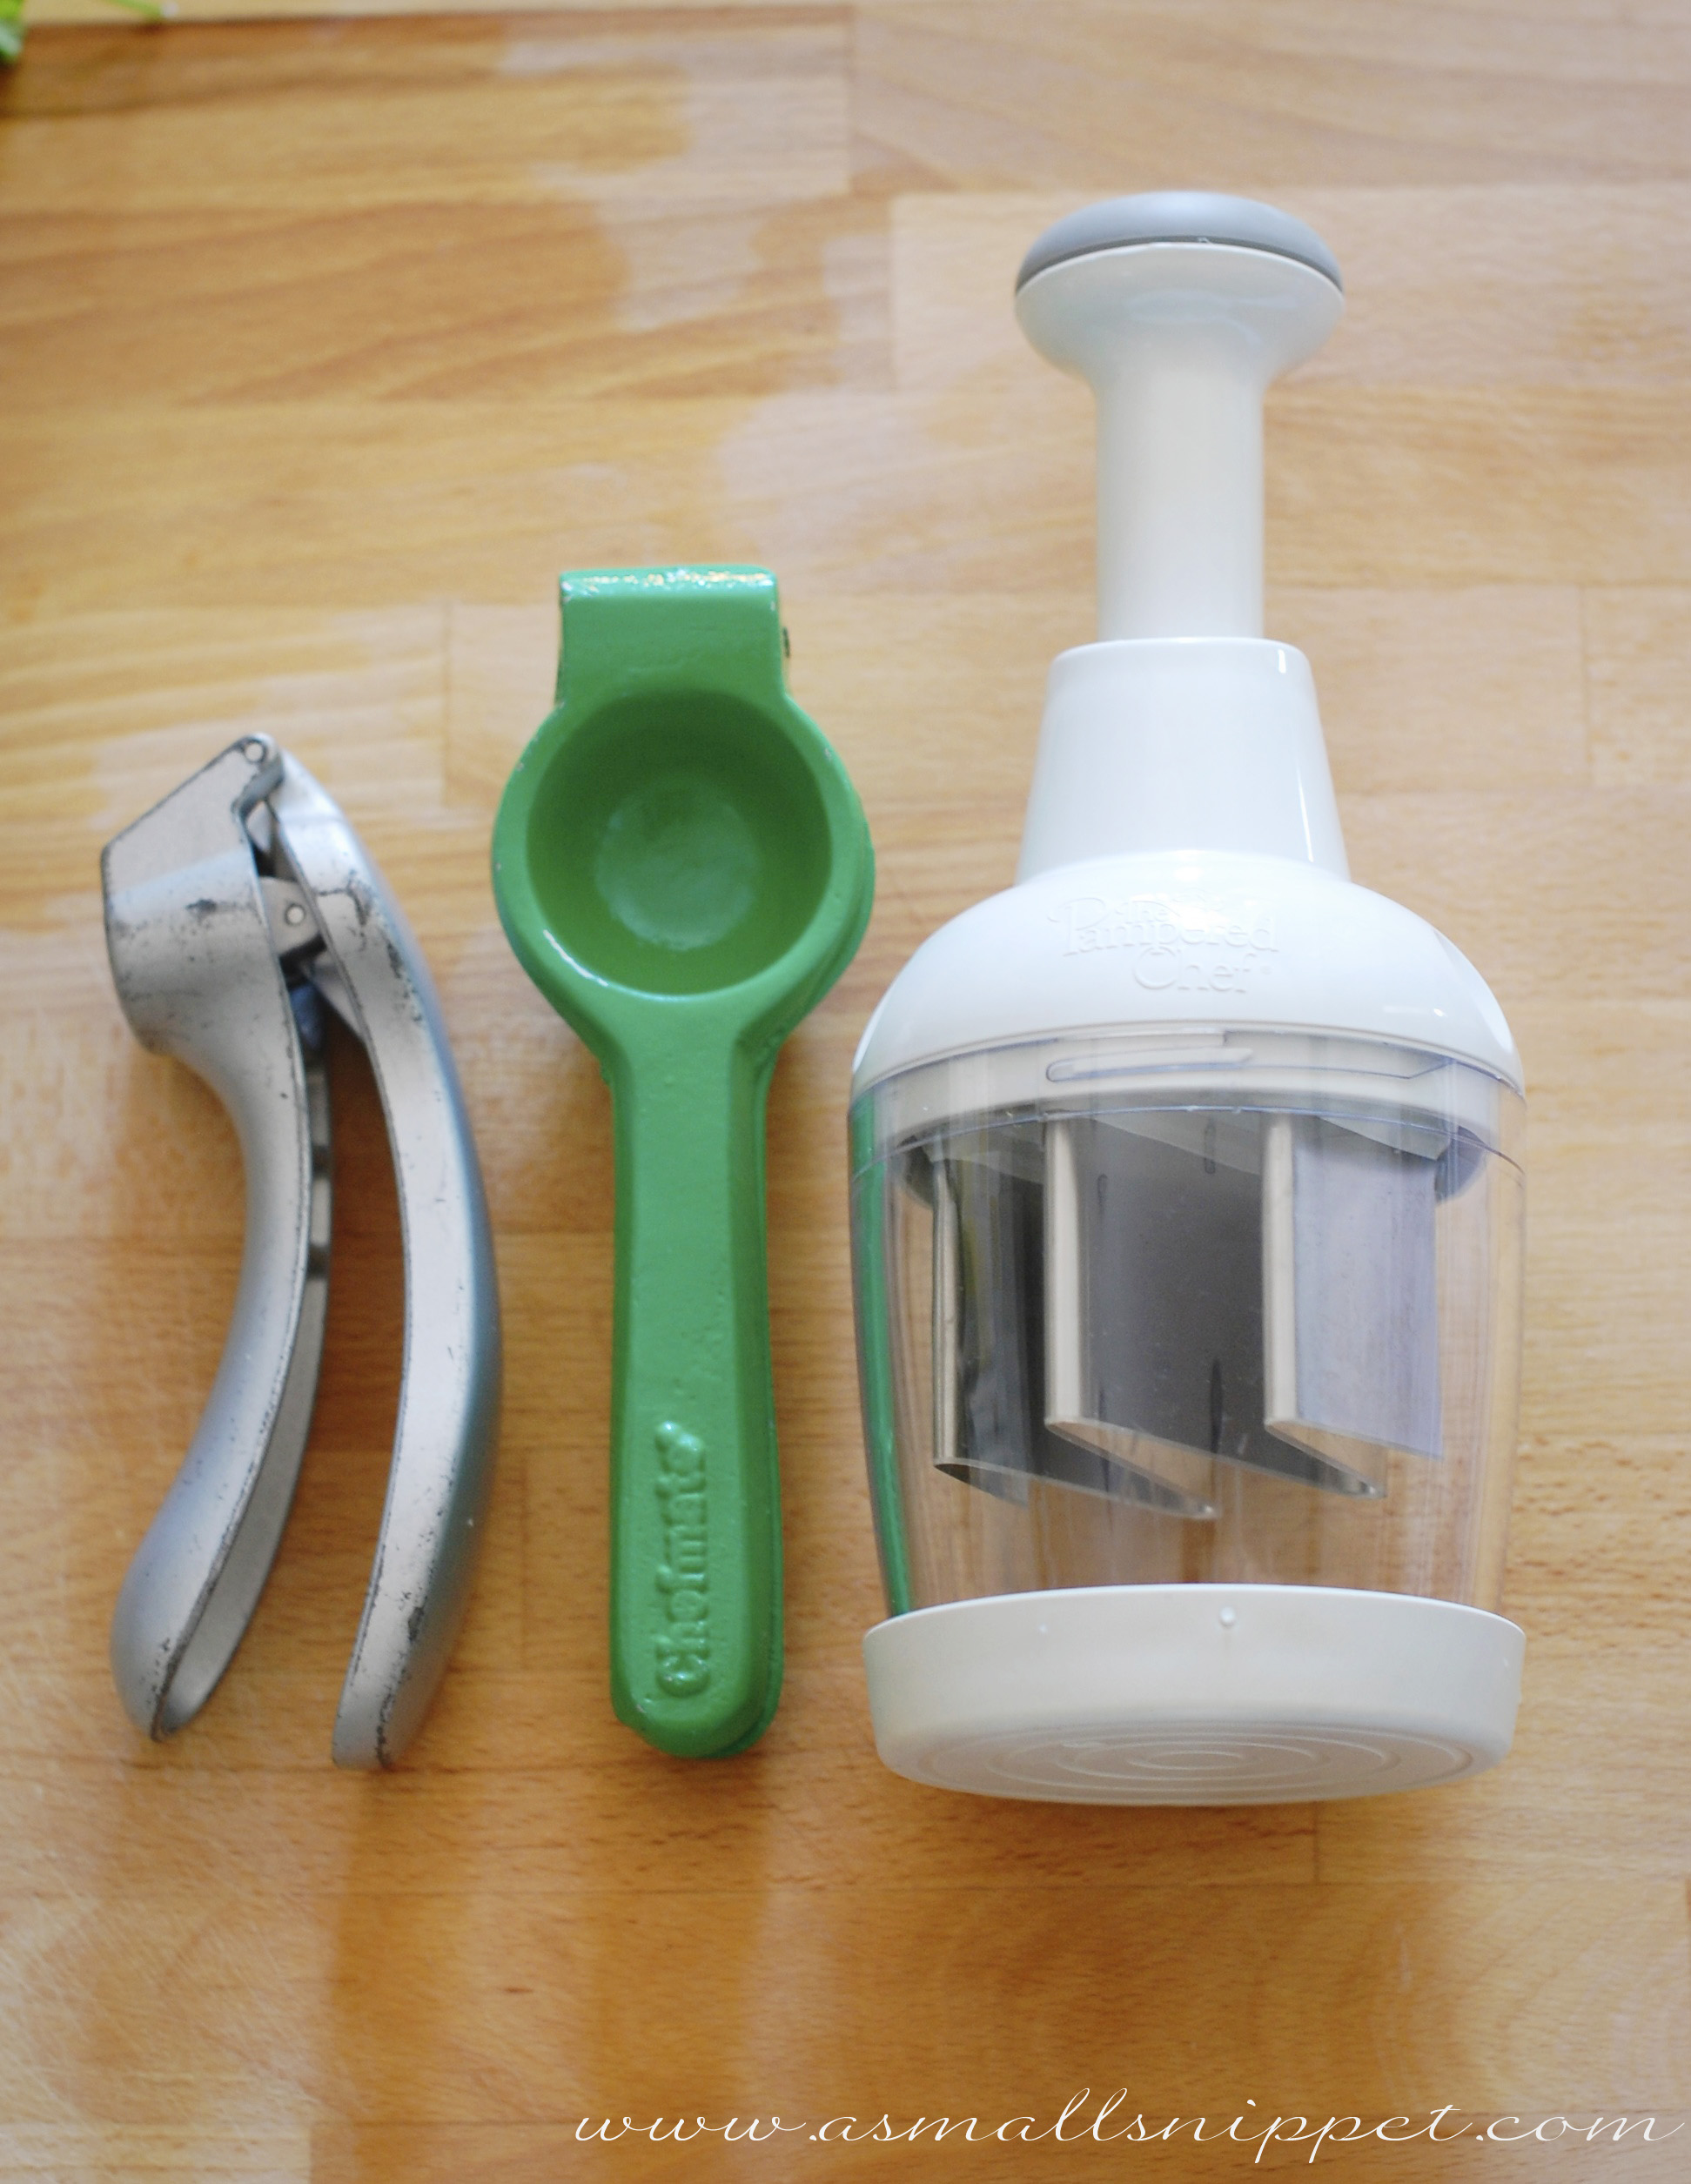
the first tool is a Pampered Chef Garlic Press.  this might be my all time favorite kitchen tool ever.  i picked it up at a garage sale, and its sincerely amazing.  you just put the whole clove of garlic, peel and all, into the compartment:

DSC_0228

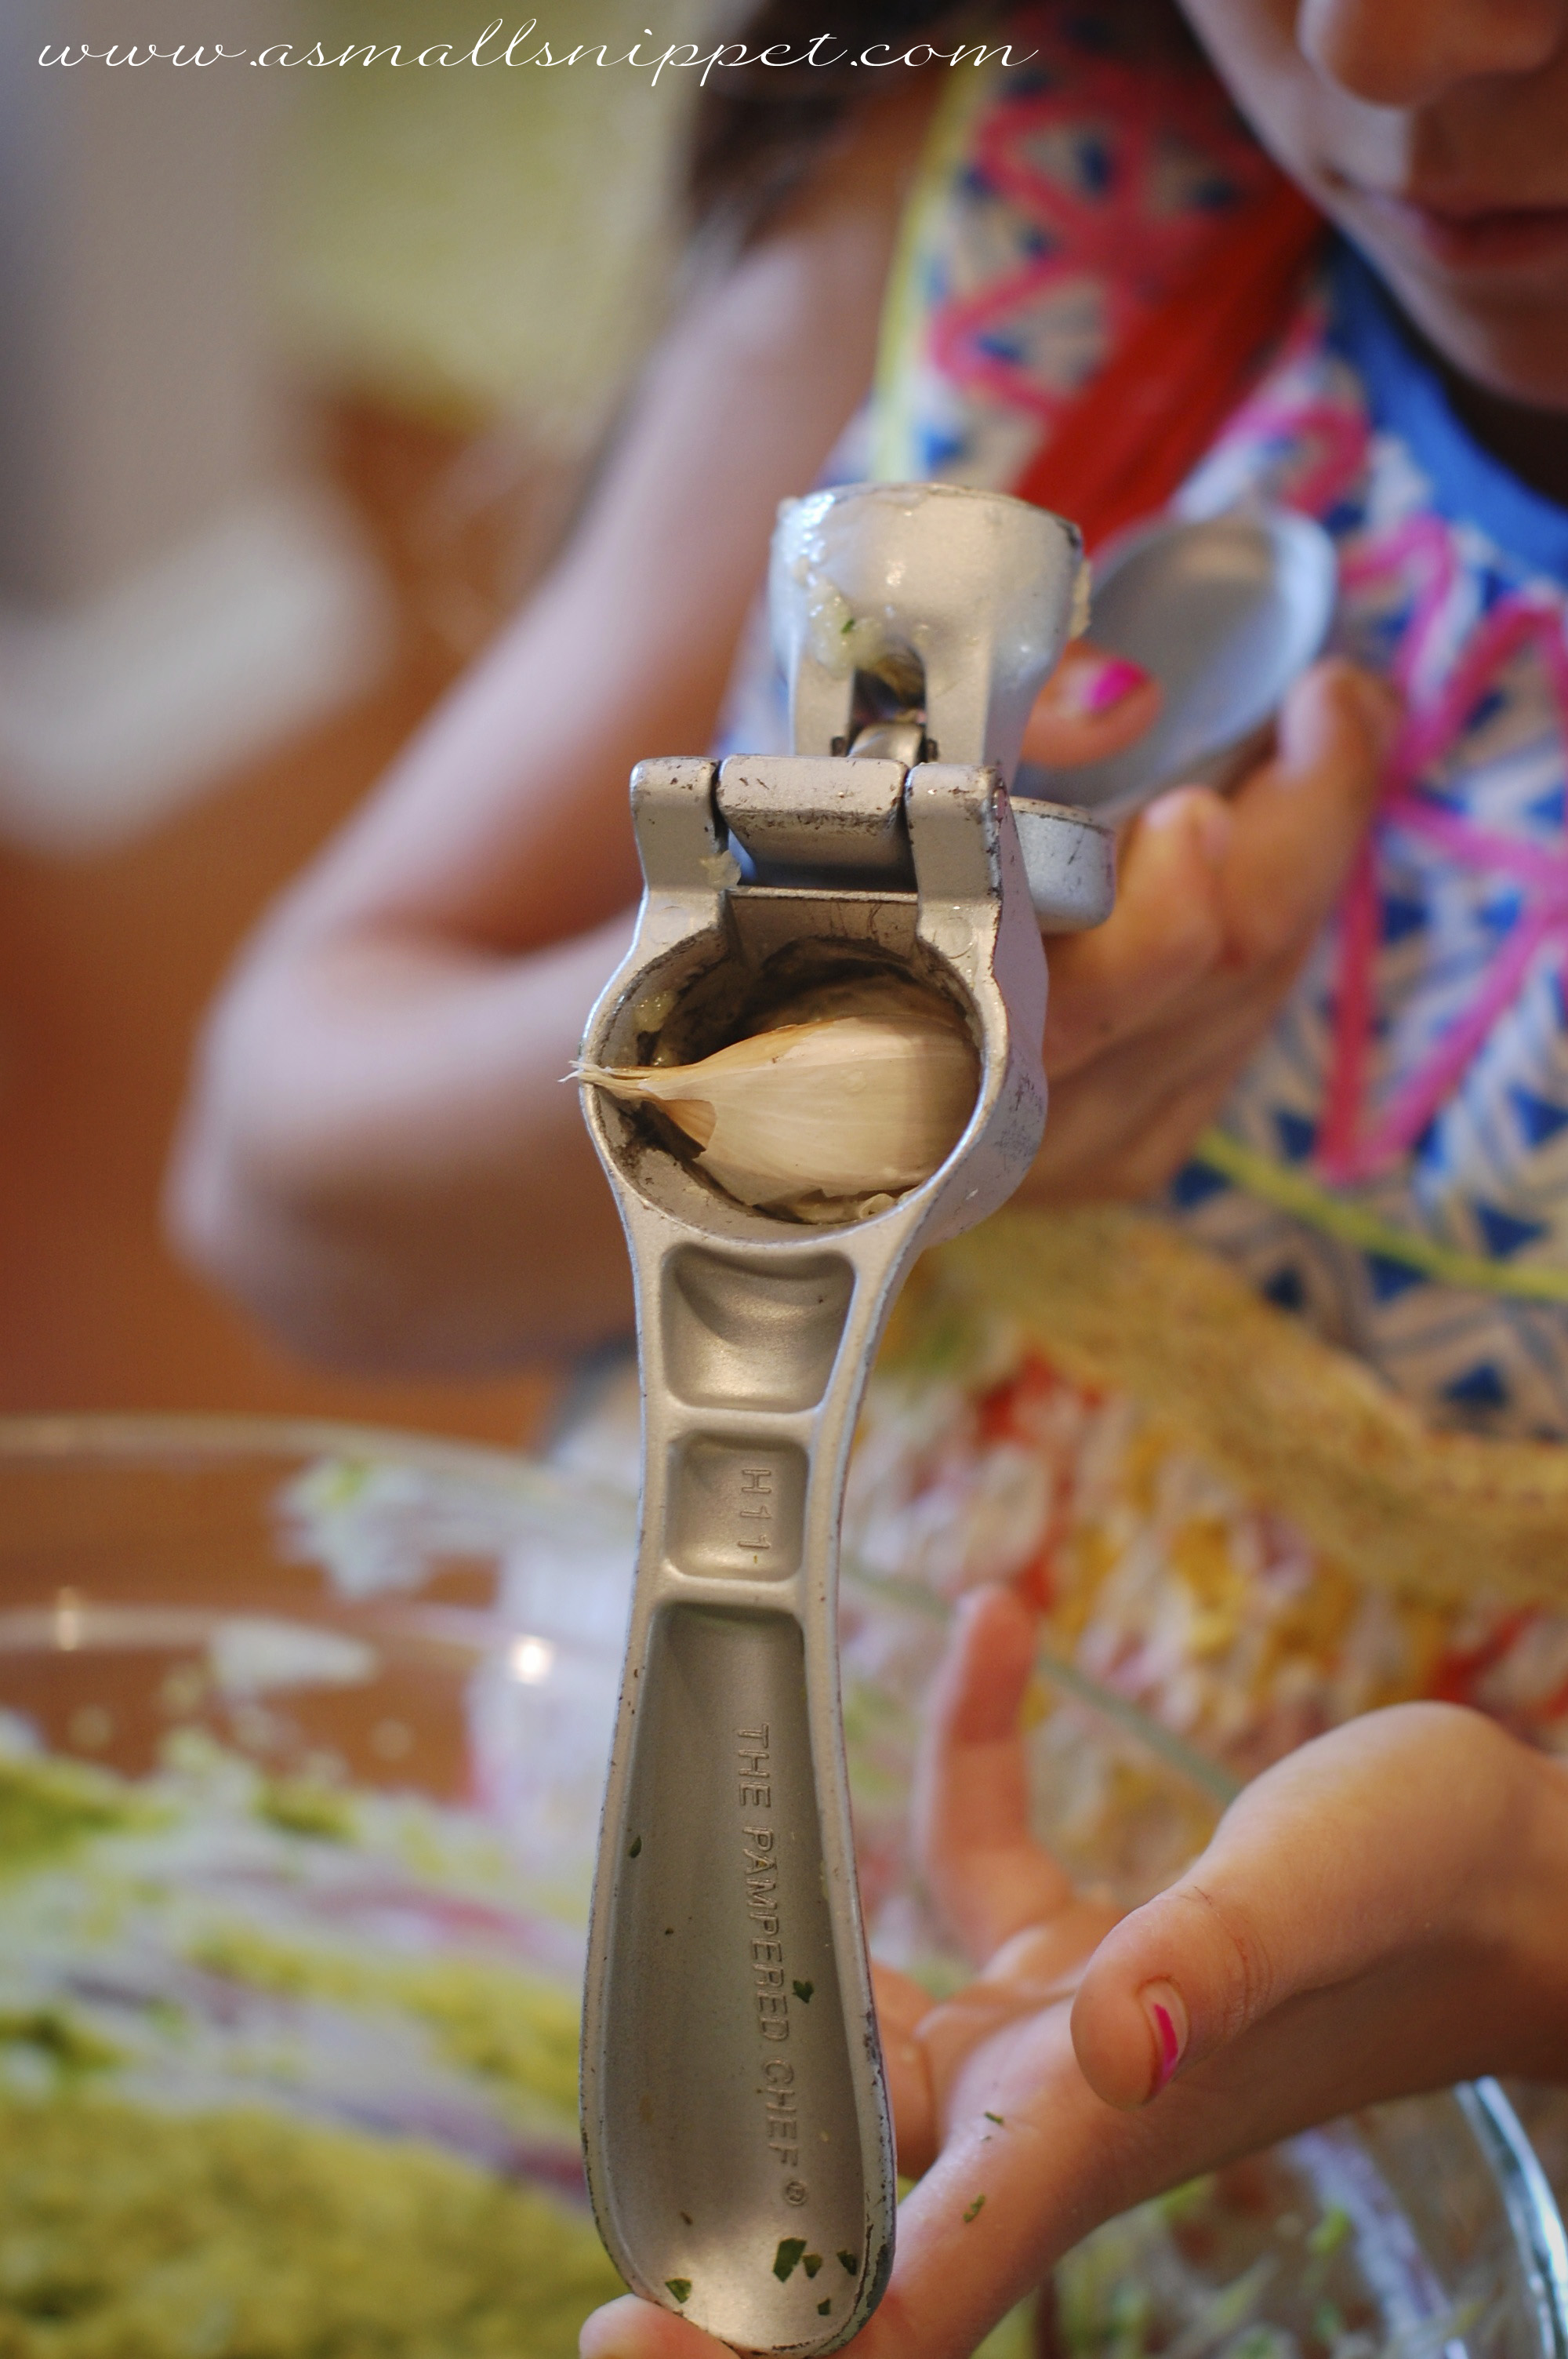
and press, and it magically crushes/minces the garlic, while leaving the peel behind.  its incredible.  (works best if you do one clove at a time.)  with the amount of fresh garlic i use when cooking, it saves me an obnoxious amount of time!

the second tool i also picked up at a garage sale.  its a simple handheld juicer, (here’s a similar one: Handheld Juicerbut it gets way more juice out of lemons and limes than i could simply by using my hands.

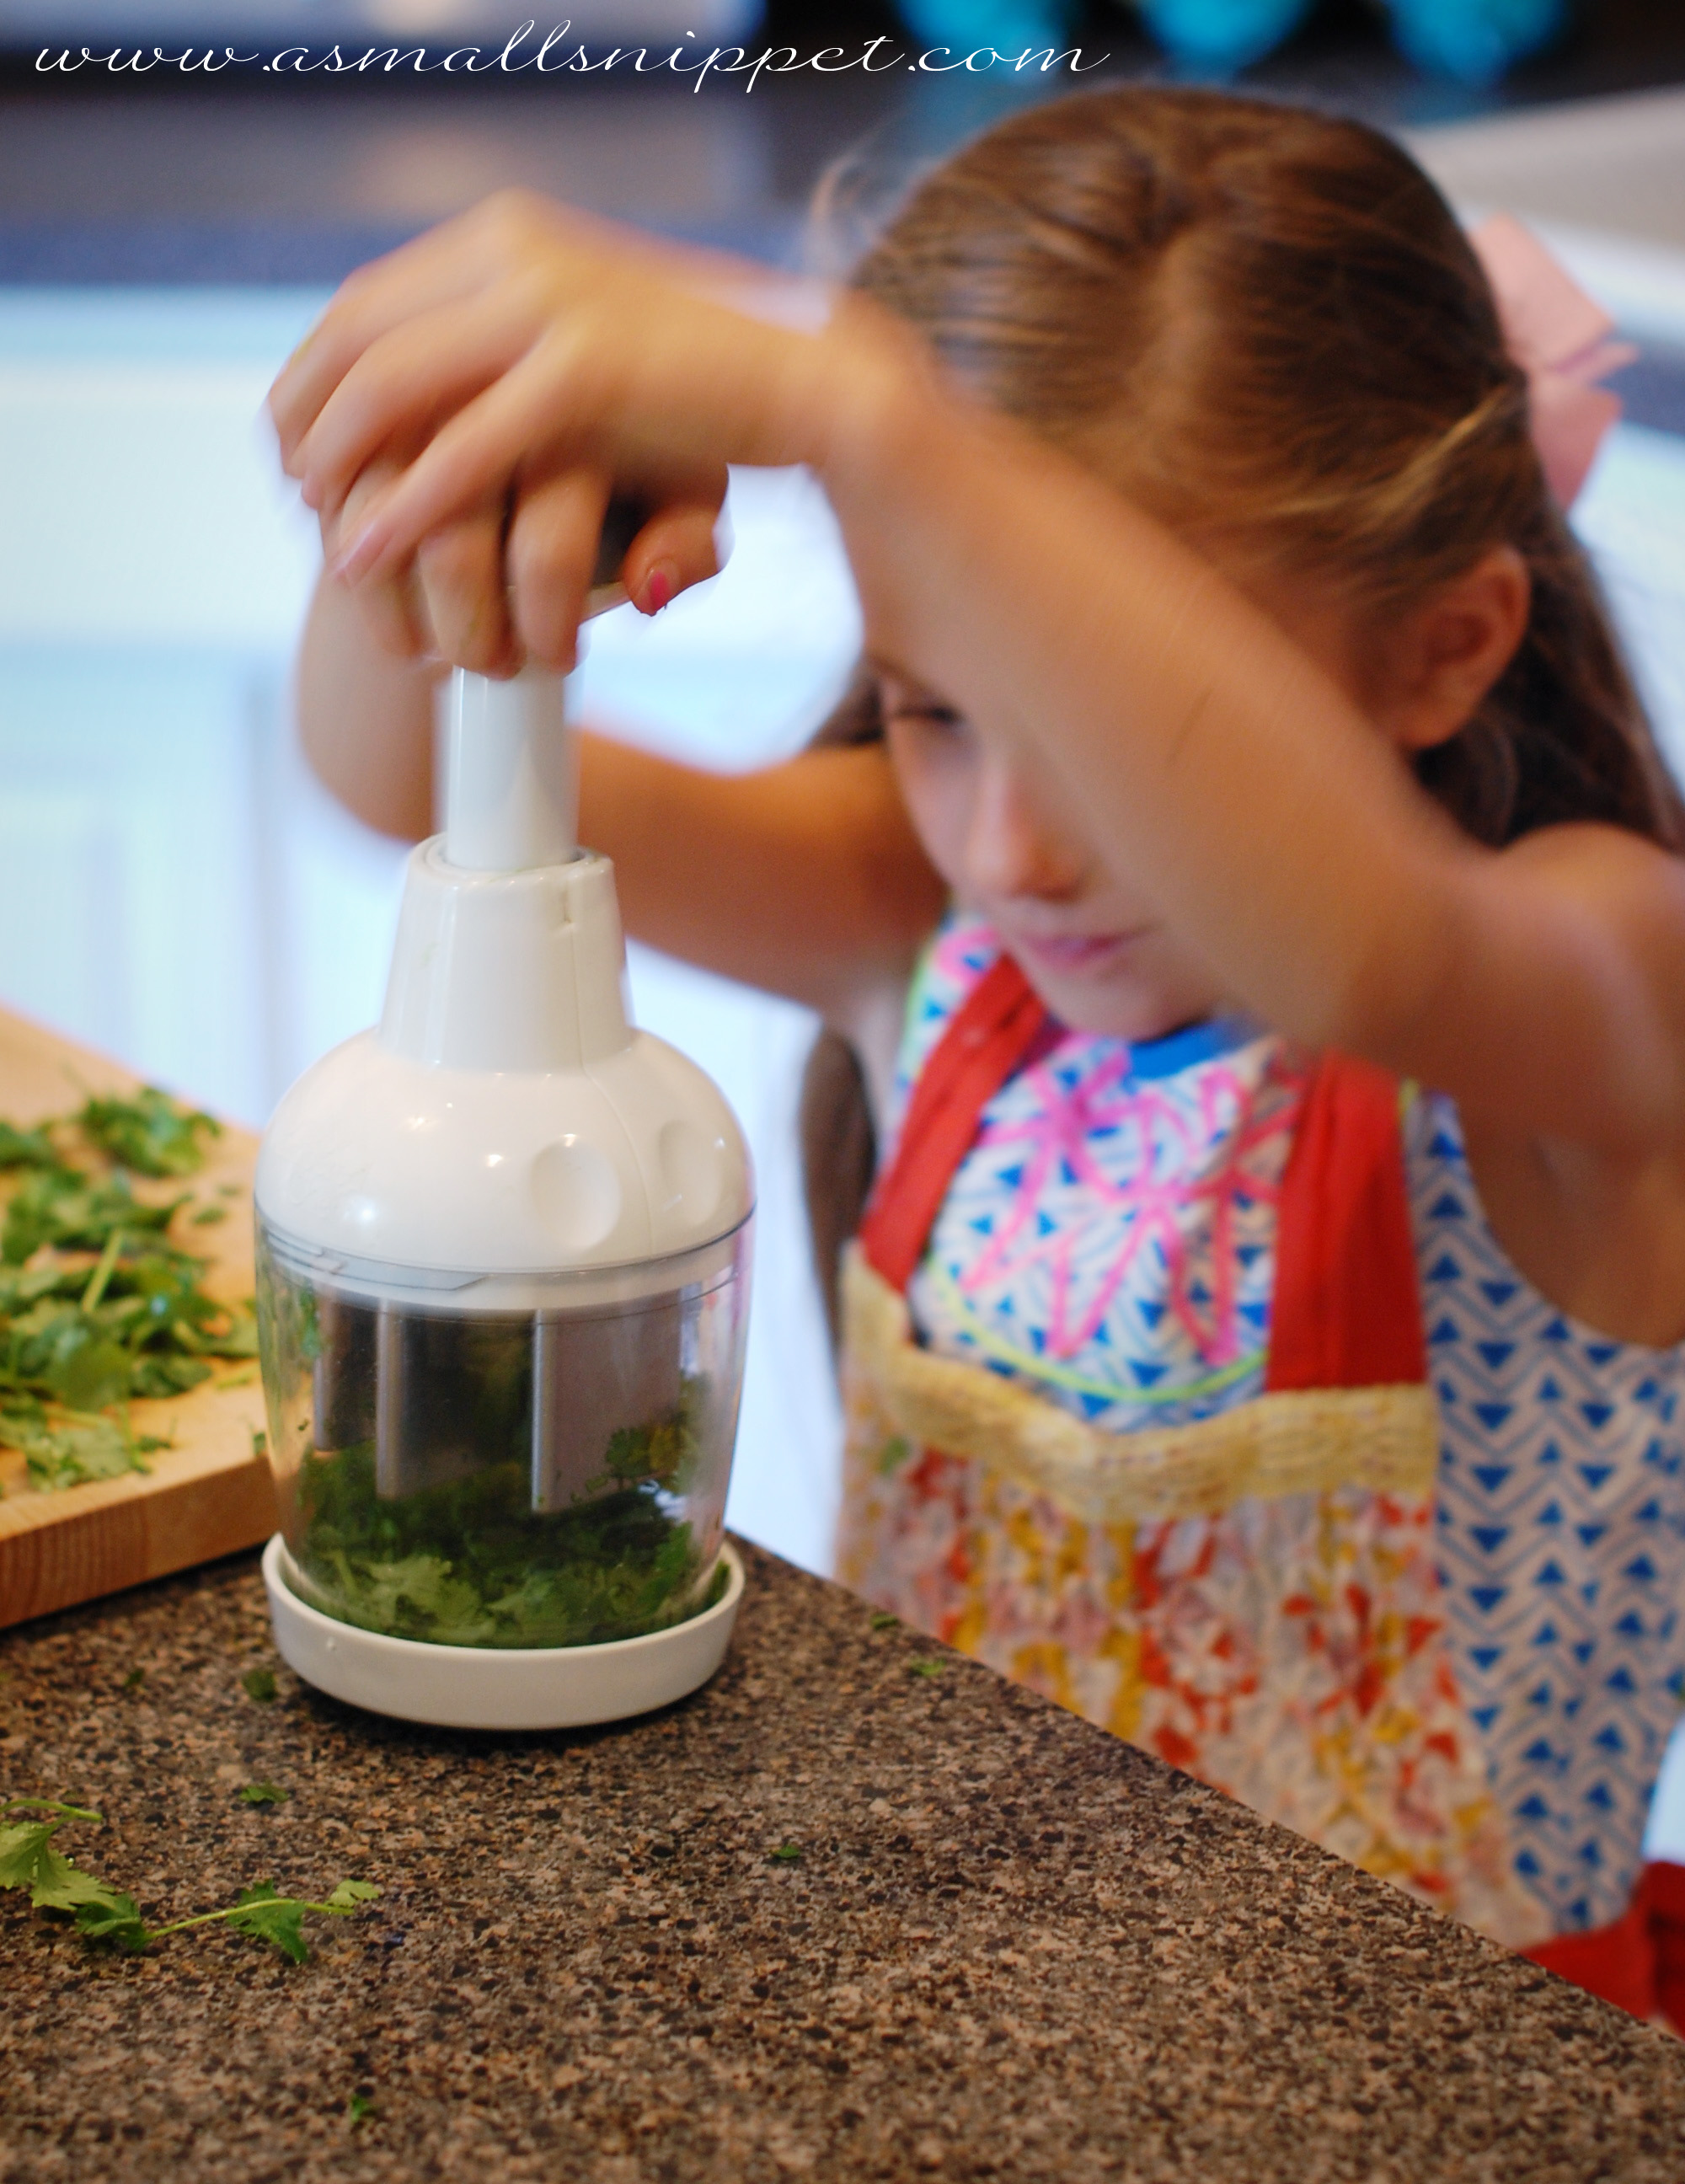
the third tool i got as a wedding gift, and it sat in my cabinets for years before i figured out how incredible it was.  its a Pampered Chef Food Chopper, and its perfect for just that…chopping food, especially herbs, like cilantro!

these tools certainly aren’t necessary and this recipe can be done without them, but they make life a lot easier and they are a fun addition to any kitchen if you happen to be looking to add to your repertoire.

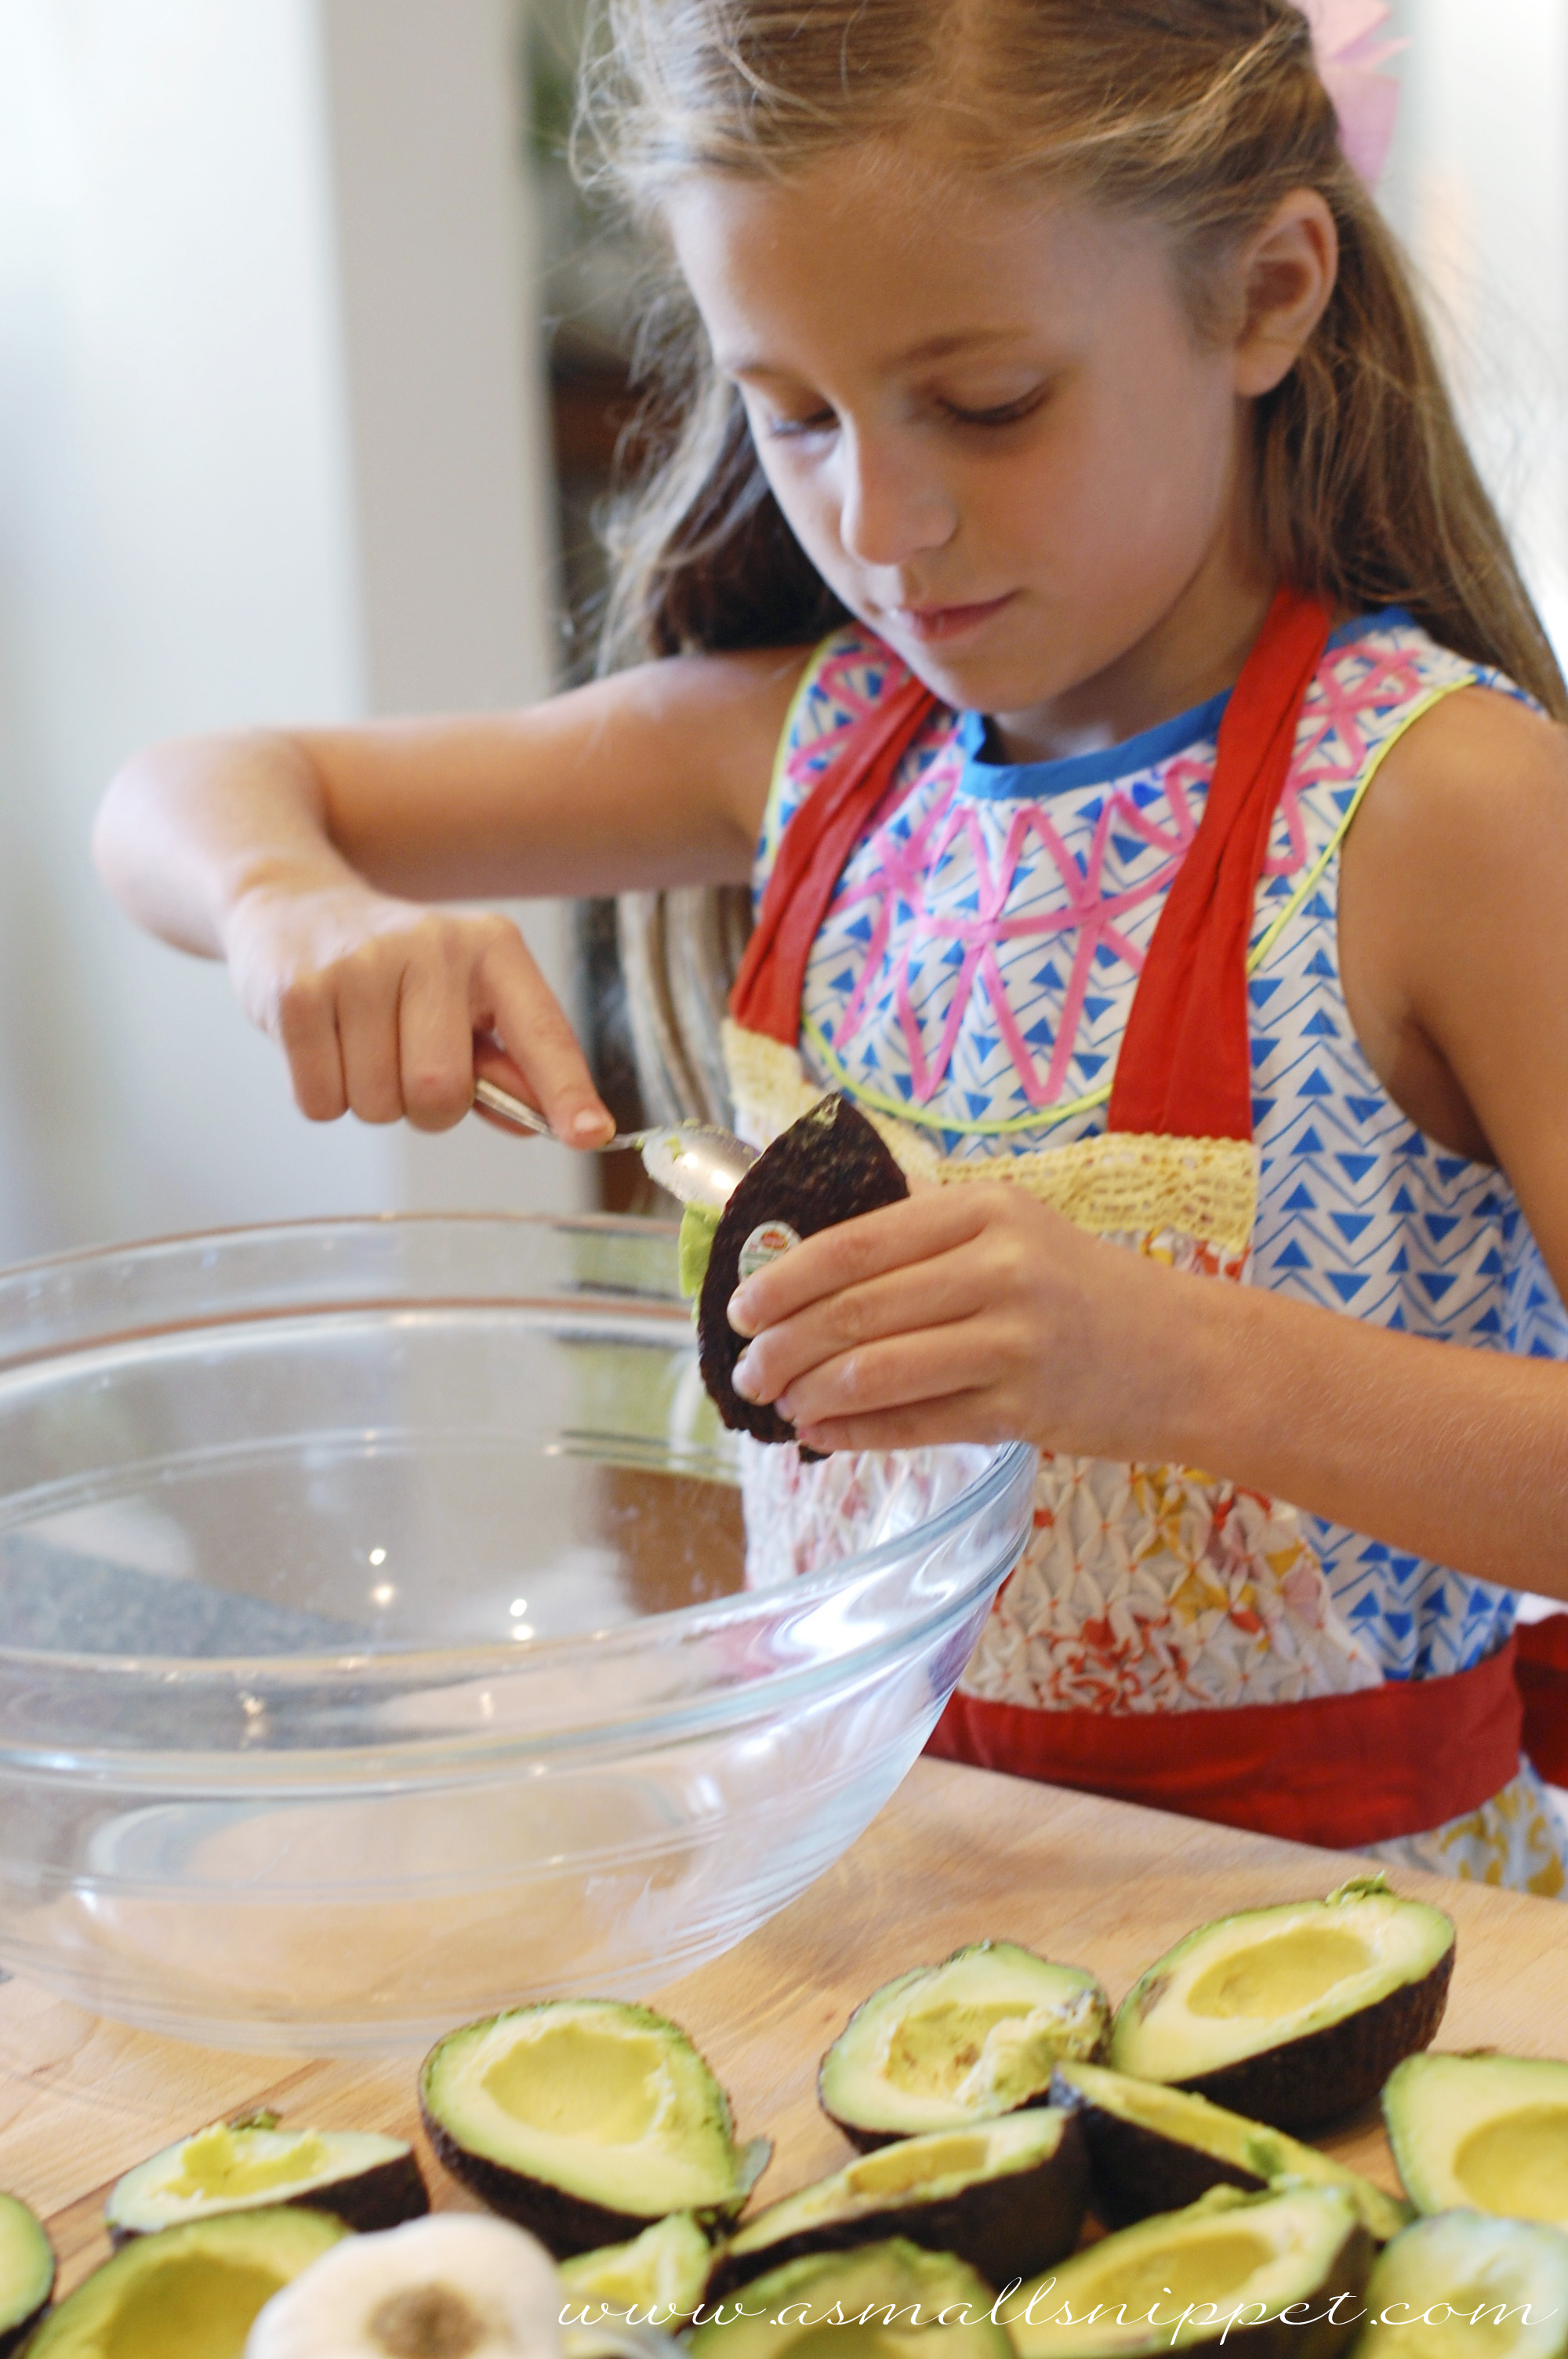
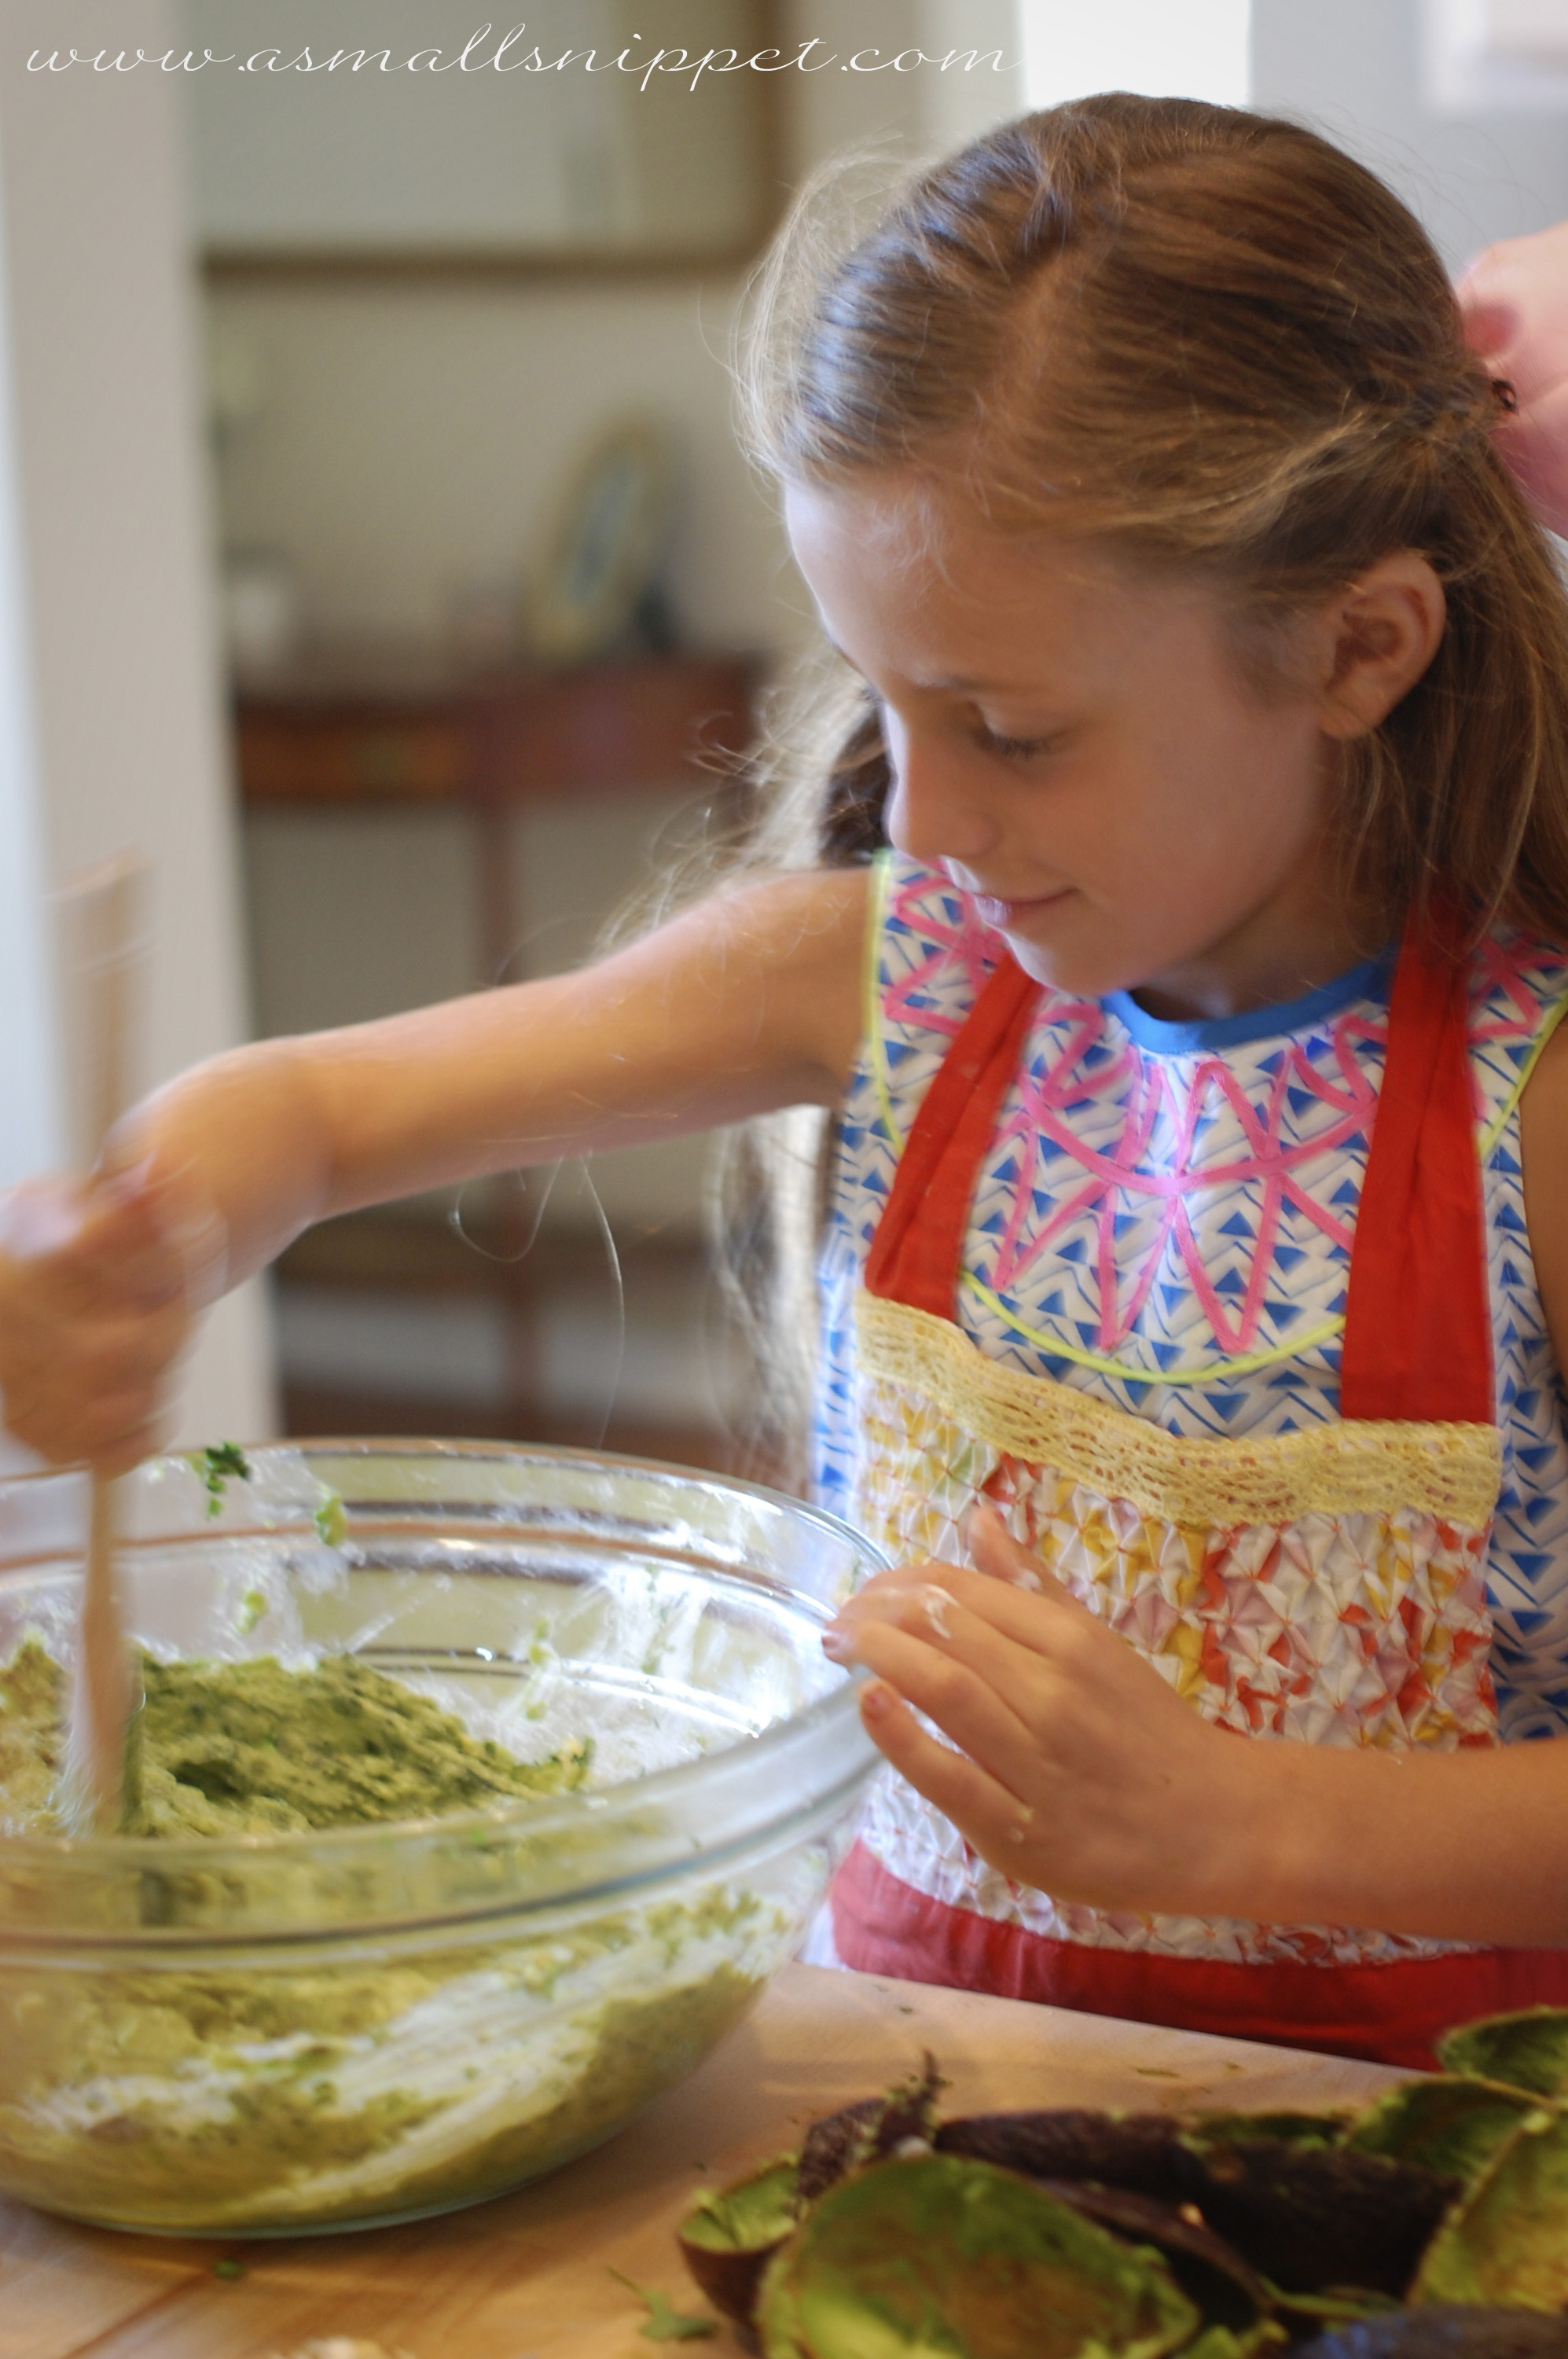
so first off, scrape your avocados into your bowl, and smash with the back of a fork.  sometimes i’ll get the process started by mashing them when they are still in the peel, and then scraping them out, but whatever method you use works!

DSC_0212 copy

next, take the cilantro leaves off the stem (i usually try to scrap them off with a knife to save time, and then pick out the long stems that made their way into my pile of leaves.  a few stems never hurt anyone!)  then use your handy tools (or a knife) to chop up the cilantro:

DSC_0217 copy

add the minced garlic to the bowl:
DSC_0230

and the juice of 1-2 limes:DSC_0219
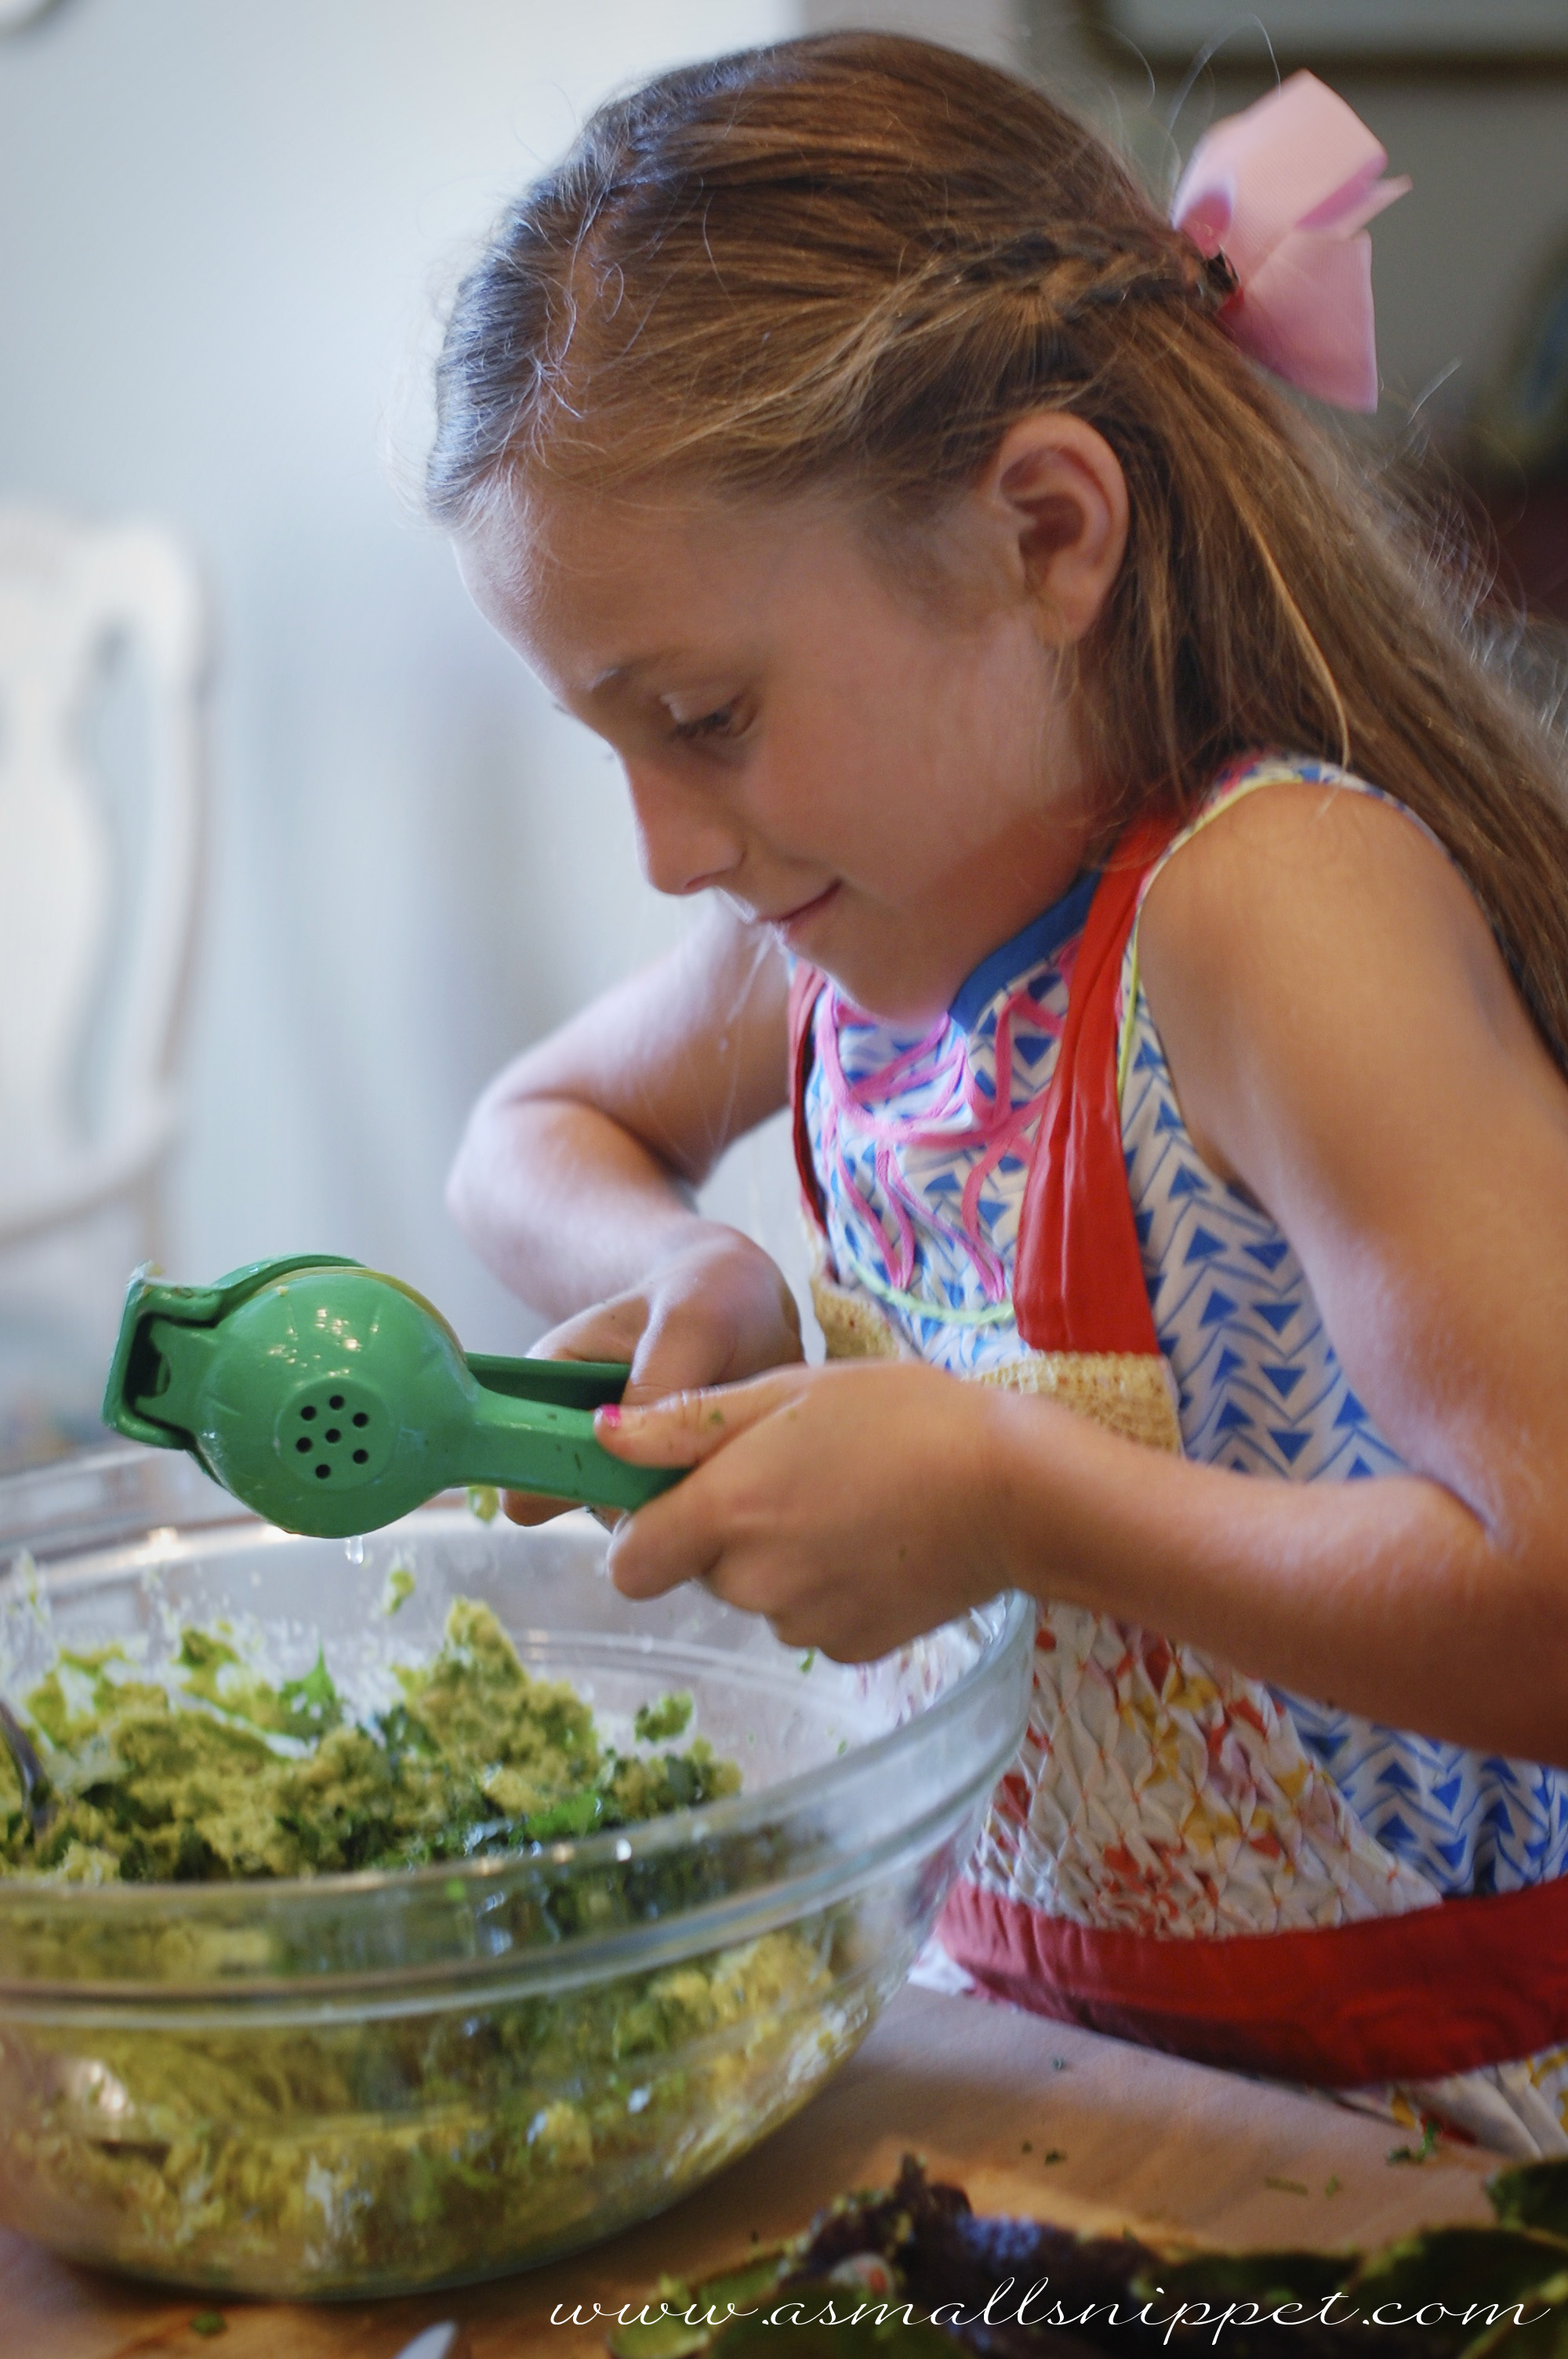
then chop your seeded jalapeño into small pieces and add that to the bowl.  i never use my wooden cutting board for onions or jalapeños, because i don’t want the heat and flavors to transfer, so i always use a separate cutting board that i can just throw in the dishwasher to ensure it gets all the little bits of food off.
DSC_0214 copy

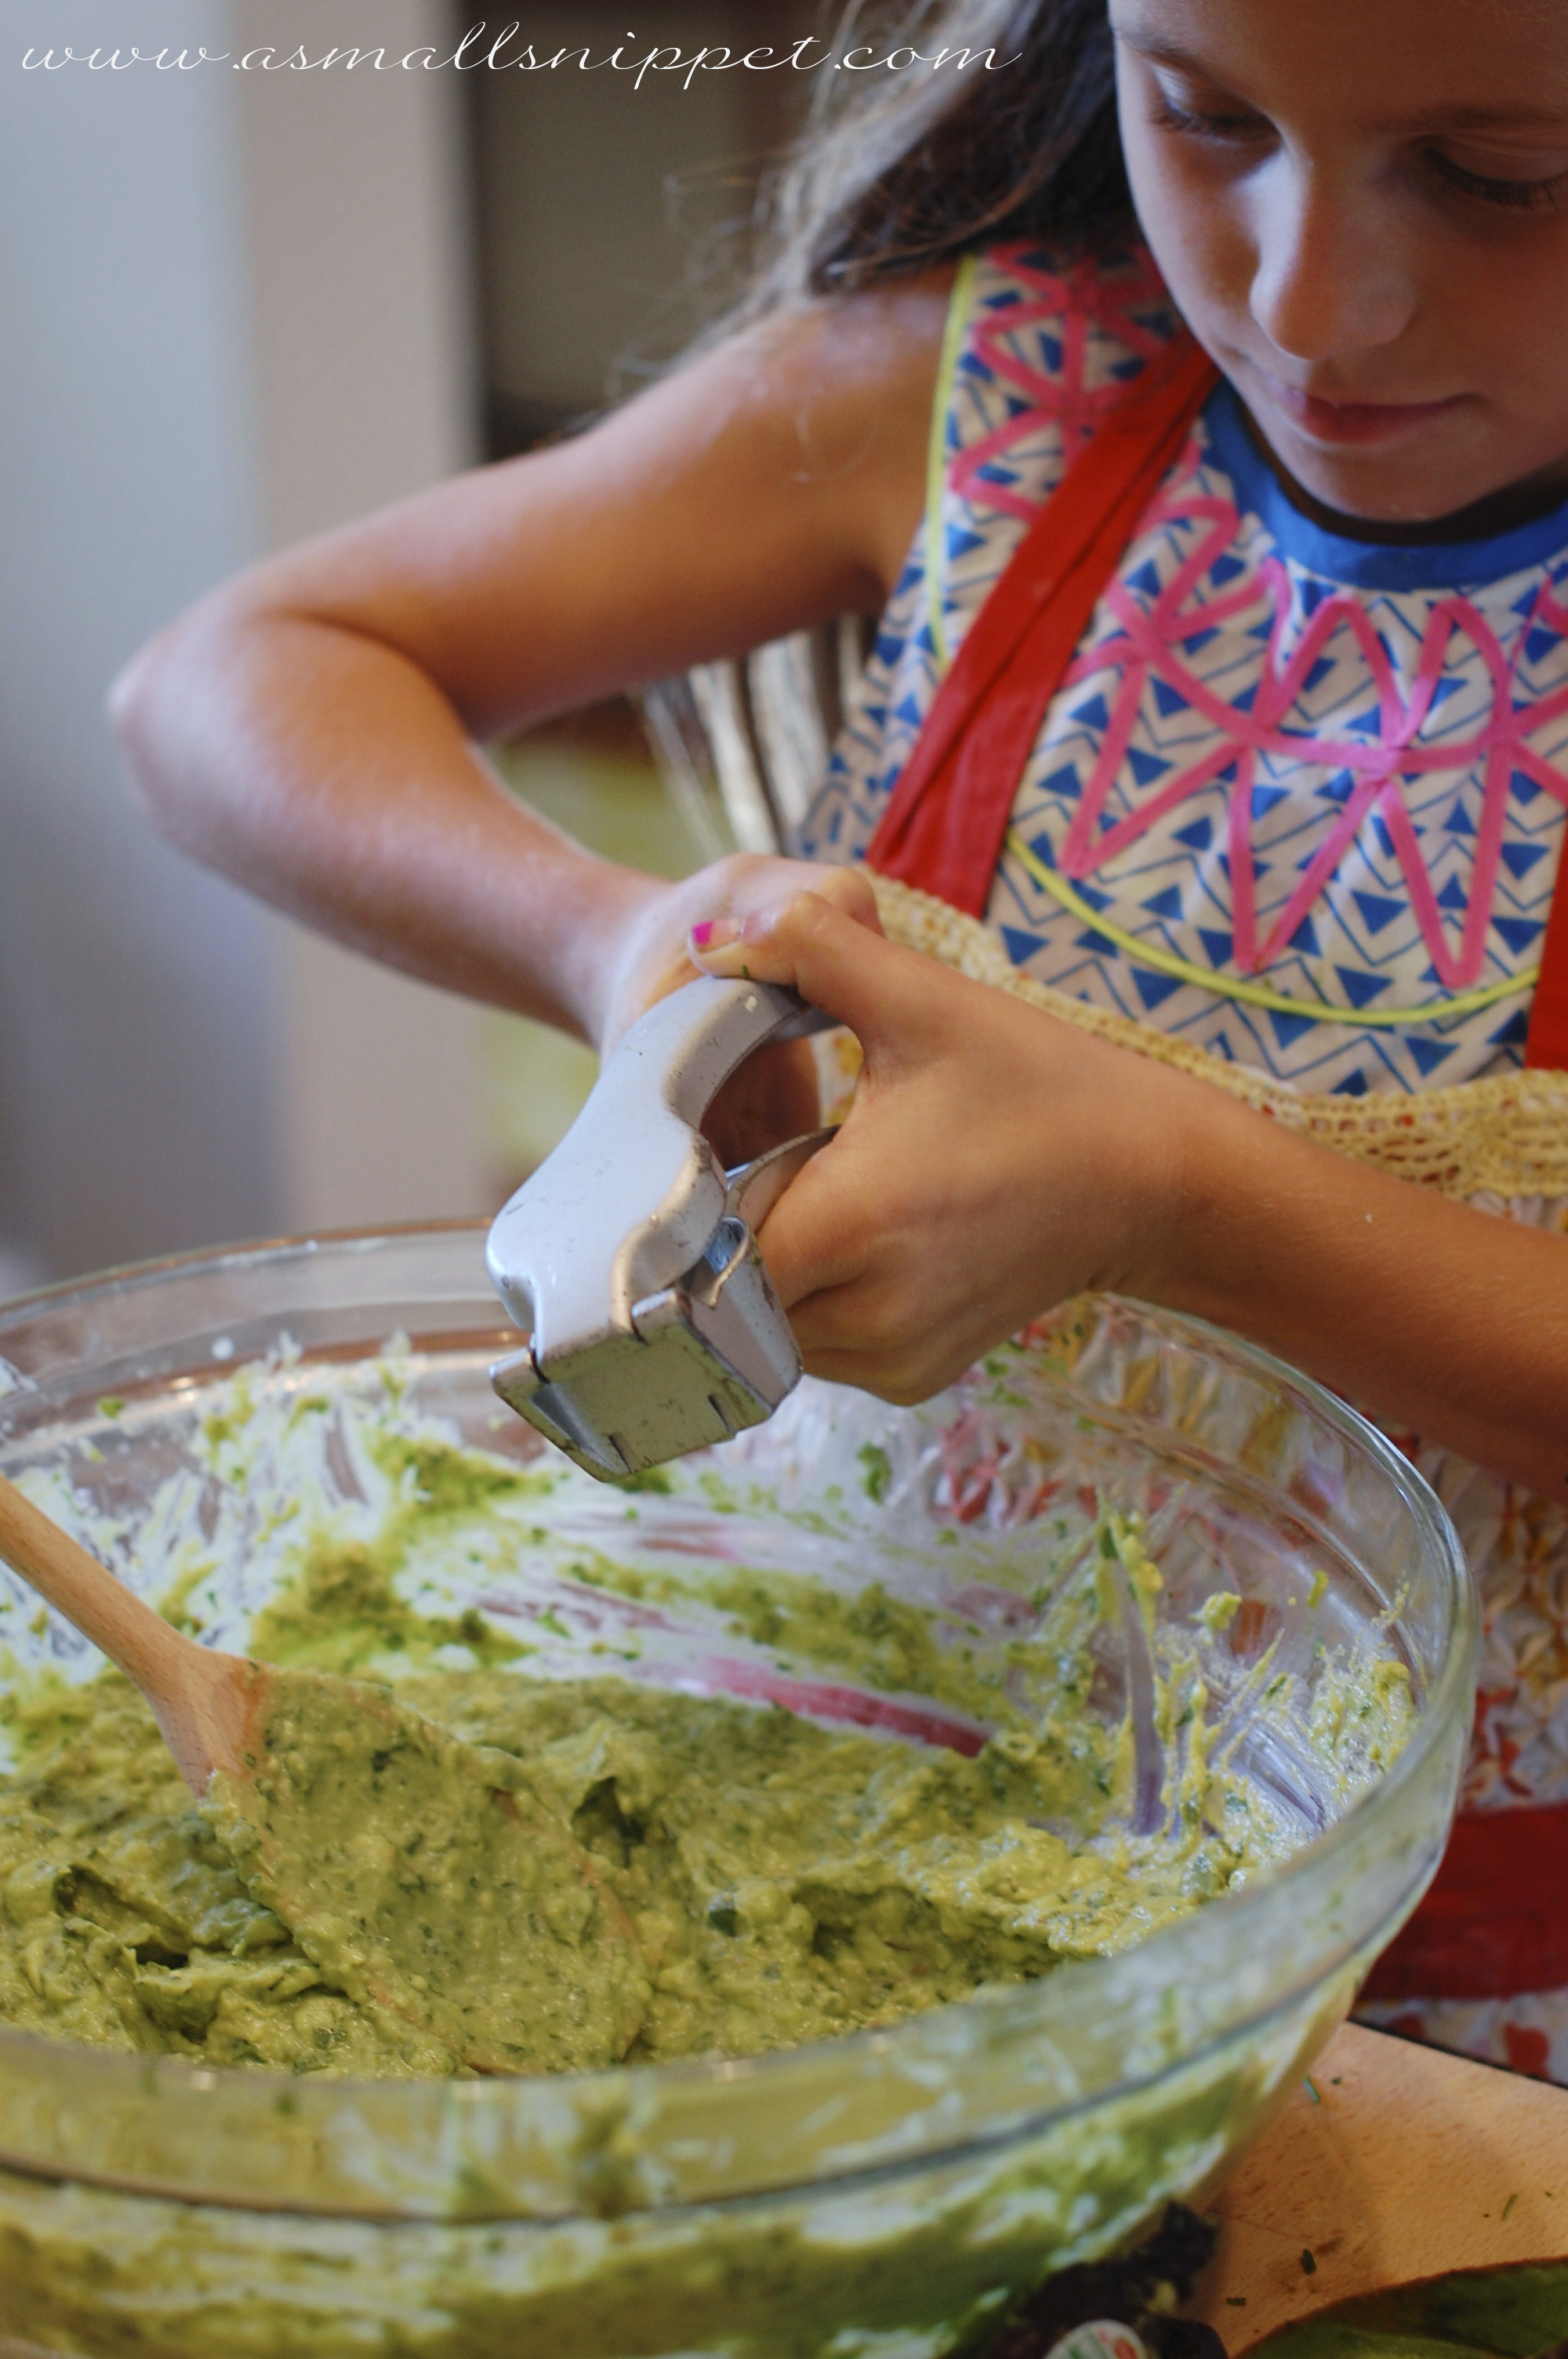
you then add a big dollop of Greek Yogurt and stir it all up.  that’s Bella’s “secret” ingredient, and it makes her guacamole super creamy and yummy.

DSC_0221

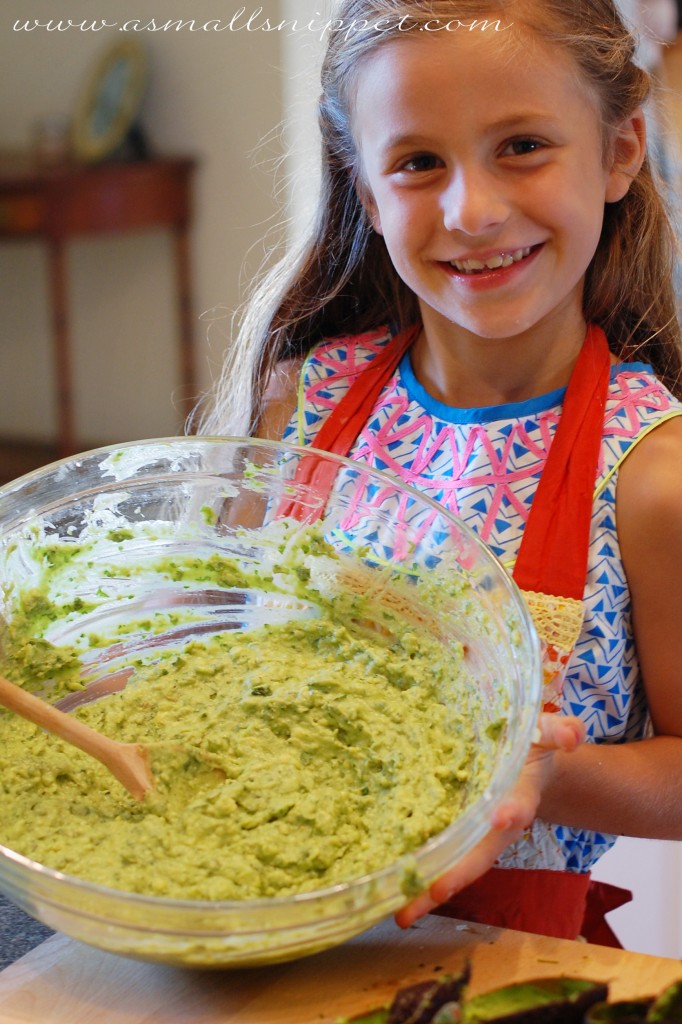
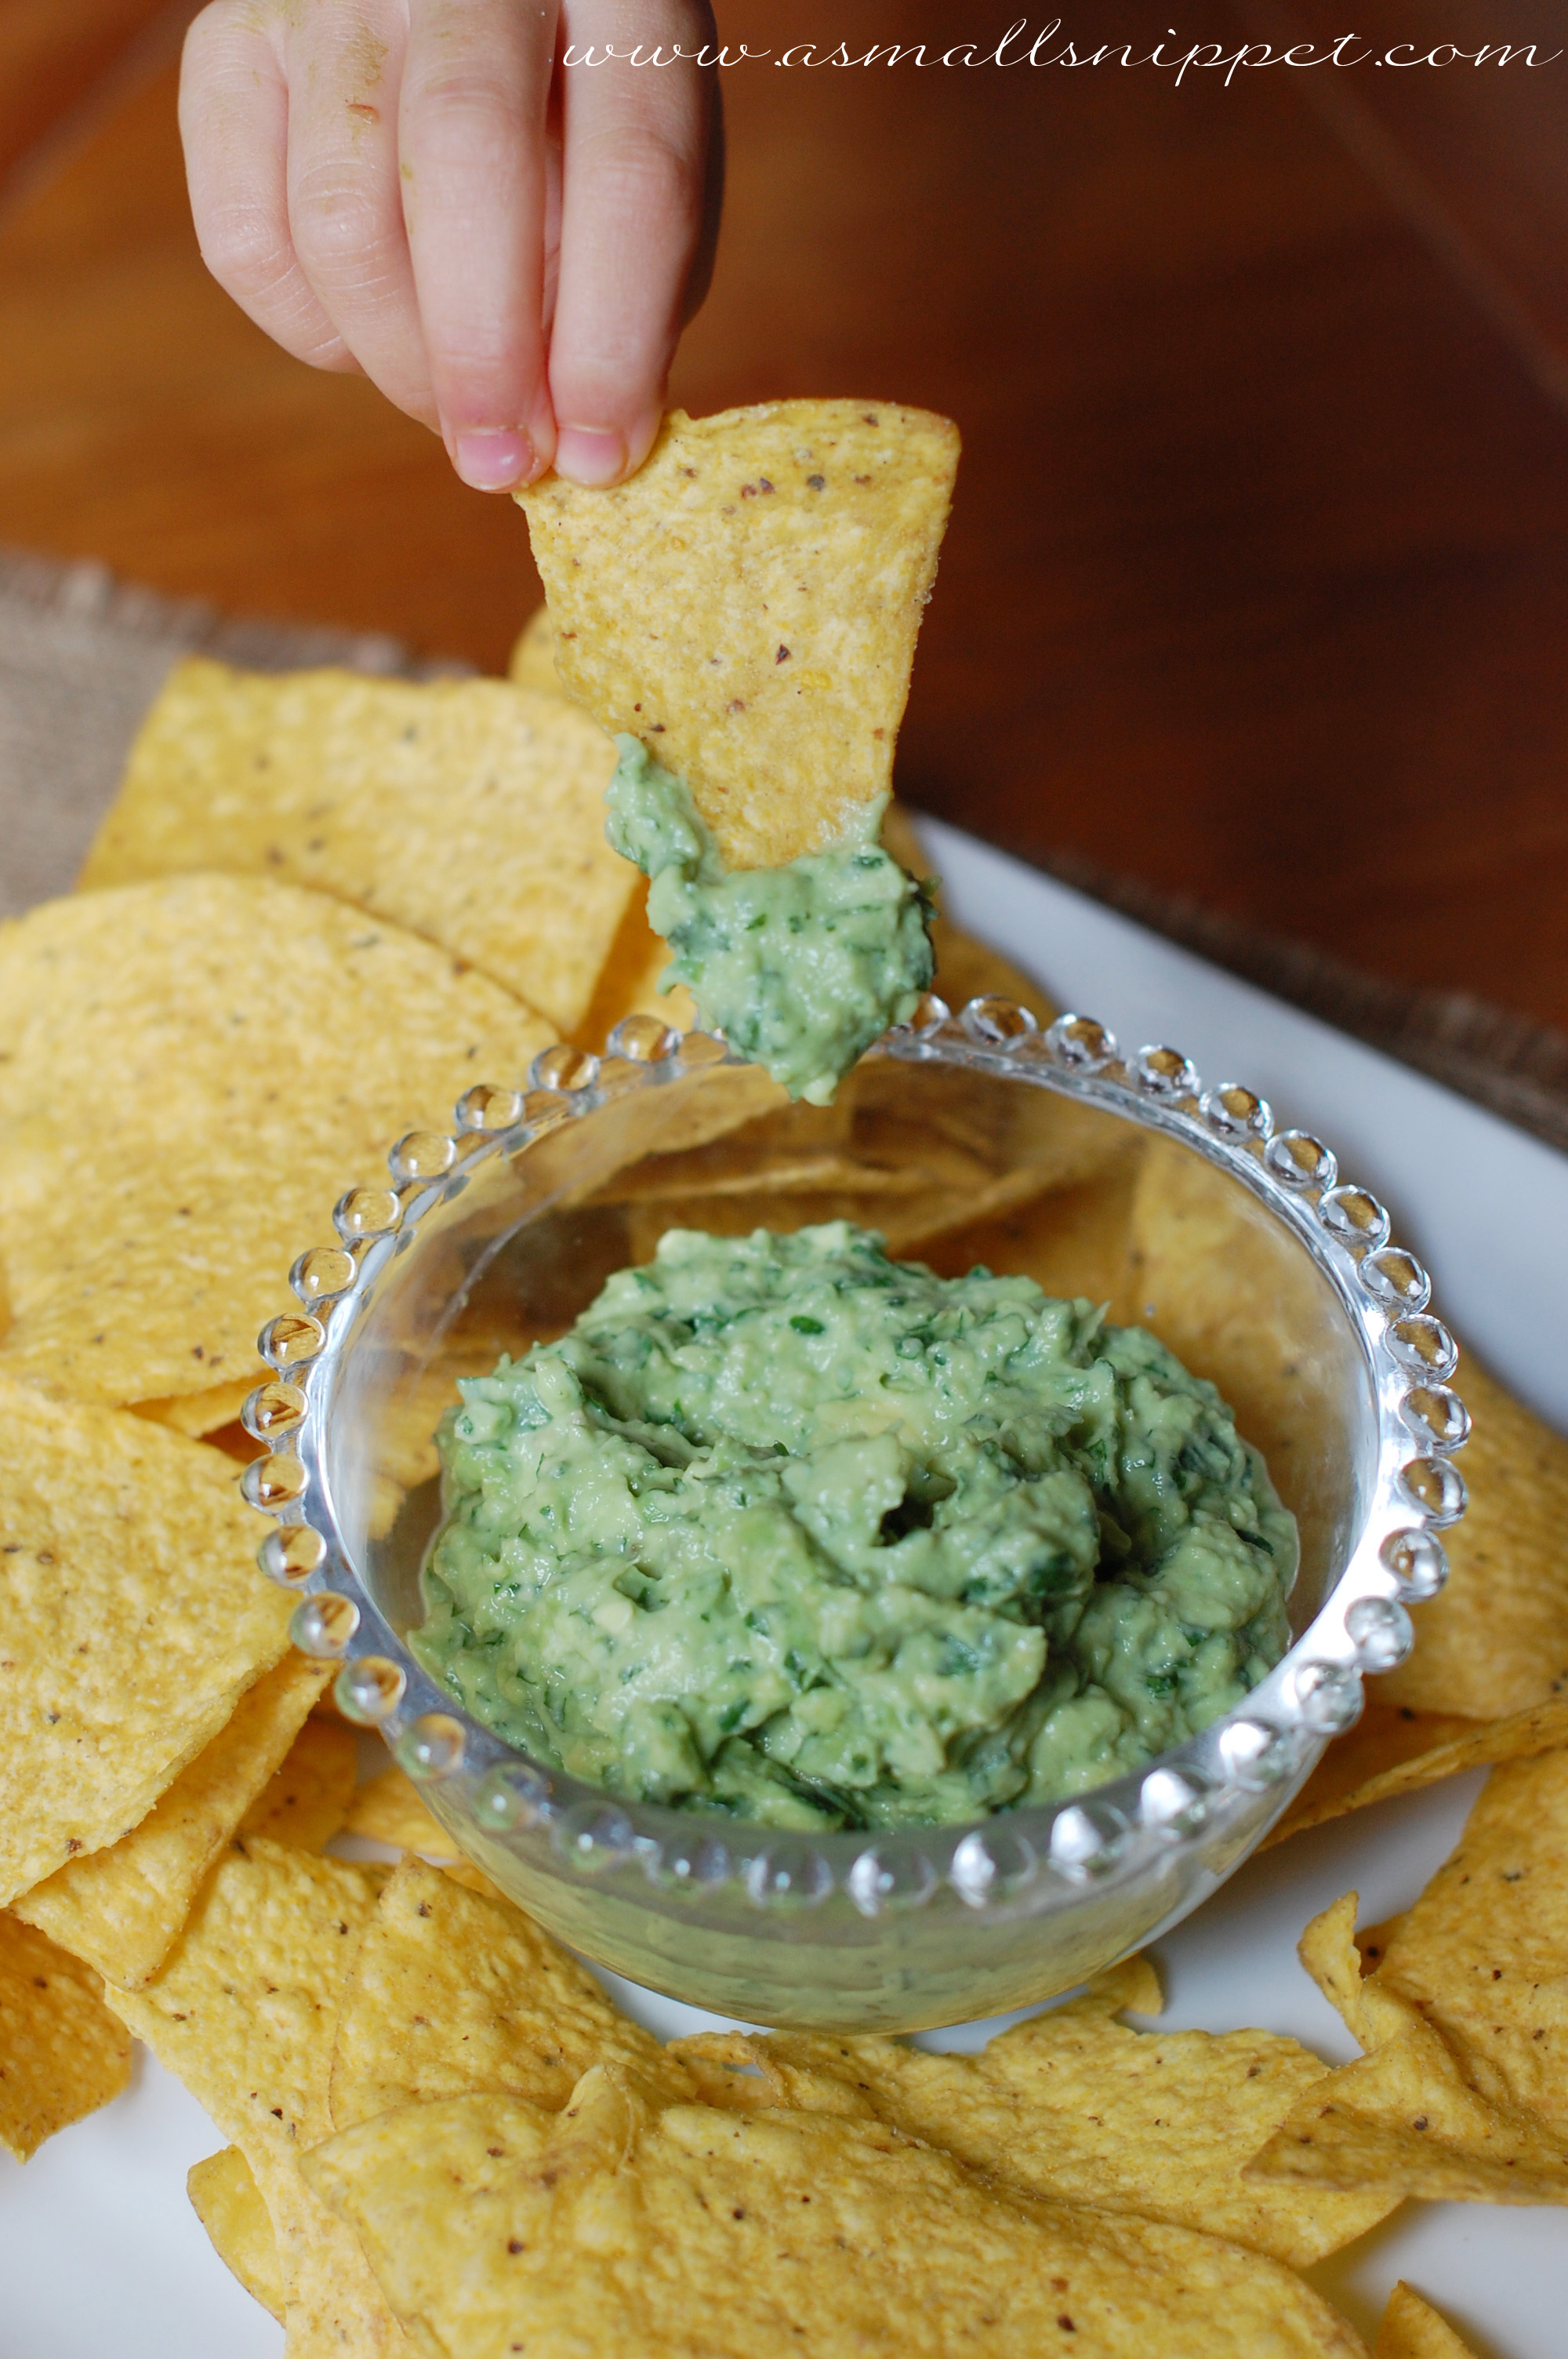
stand back and admire your work!
DSC_0222

then you need to taste it, to ensure that you have the proper amount of salt and lime juice.  we add more, a little bit at a time, until its perfect.  so add salt and more juice to your liking.  sometimes we are even known to add a little more garlic, if Chef Bella decides that the flavors are still a little bit off :)

DSC_0225

there you have it.  Bella’s Famous Super-Creamy-With-A-Little-Bit-of-Heat Guacamole Recipe.

DSC_0513 copy

and here’s a little tip for you.  i read this once somewhere, and i don’t really know if it works or not, but i like to think it does, so here you go…apparently if you leave the pit of an avocado or two in the guacamole, it’ll stop it from turning brown so quickly.  go try it and see what you think!DSC_0234 copyand just for fun, here’s a quick little video of Chef Bella explaining what she did.  her measurements in the video are for a double recipe.  she also forgot to mention the jalapeño, her feet are really dirty, i’m a bad video-grapher, and if you listen closely, you can hear Berkeley making sure we are all aware that she has woken up from her nap.  also…please, whatever you do, don’t put two “handfuls” of salt in!!  all very good reasons why i don’t ever post videos on here.  :)
by the way…does anyone else’s kiddos call Yogurt…”Yogrit?”  i don’t have the heart to correct her…its too darn cute.  ENJOY!

and here’s the recipe card for you.  just right click on the image to save to your computer and print!
guacamole recipe card

6 Comments

Sep

11

Pink and Gold First Birthday Party

we finally got to host Berkeley’s Pink and Gold First Birthday Party this past weekend…only a month late, but who’s counting?  :)
DSC_0137 text

let me just tell you…this party…was the never-ending party!!  we originally planned a big blowout on the beach in the beginning of August, but right as we had just unloaded the cars and brought everything down onto the beach to set up…this happened:

IMG_1466

serves me right for planning a beach party in Florida in August.  i should of known better.  so my dreams of a beautiful beach bash were shattered.  and because right after that, our lives got REALLY CRAZY, we weren’t able to reschedule until this past weekend.  so what you’re going to see in this post are pictures of the four different times i set up for this party….

1) the first time on the beach (not many from there, because it was a mad dash back to the cars to ensure no one got struck by lightening)
2) the second time (on her actual birthday, when our family came over to celebrate since we had to cancel the weekend before, and we didn’t want her bday to go by uncelebrated),
3) the third time (the rescheduled party at our neighborhood pool, because i had too many cupcakes in my freezer and there was no way i was gonna let all that work go to waste, although i definitely contemplated just bagging the whole thing and waiting till she turned two)…

but since it rained right before that party started too, and i had just enough time to throw things on the table, i didn’t get to use all of my decor or take pictures, hence

4) the fourth time (in my backyard for a quick little photo shoot so i could at least capture some more details…and also the reason that the cake looks half eaten…because it was by that point!)

so there you have it….why it looks like i hosted 4 separate parties! :)

okay…now for the details:

DSC_0086 copy

DSC_0057 copy

most of the decorations were pretty inexpensive, but they did take some time.  i made the tassels out of tissue paper, and i honestly found them to be somewhat irritating to make…the tissue wasn’t easy to work with.  but once i got the hang of it, it went a lot faster.  the bunting was made with 2 different sized doilies that i just folded in half over ribbon and glued.  i love how elegant and feminine they look.  i have a feeling i’ll be able to get a lot of use out of that bunting.
DSC_0064 copy

 the high chair was my older kiddos’ old wooden high chair.  years ago i had painted it black (back when i painted every piece of furniture black…funny how my styles have changed), but had been wanting to update it anyway before bringing it in the house, so i spray painted it gold, which fit perfectly with the party colors anyway.  i used the same spray paint and sealer that i used on Berkeley’s crib.  although, gotta be honest…i haven’t let her really eat off the tray yet because i’m not sure the best way to seal it to make it food safe.  if any of y’all have suggestions, i’d love to hear them.

IMG_1148

i made smaller tassels to decorate the high chair…DSC_0112 - Version 2 copy

and created the “Berkeley is 1” circle on a site called peartreegreetings.com.  i also made these banners using those same die cuts, and then built the party colors and decor around them. their website is awesome, and the thing i loved the most was how much i could personalize their products.  i had a blast figuring out the perfect color combinations, photos, and texts to use to make Berkeley’s party one of a kind.  if you are planning on throwing a party, they have a large assortment of pretty awesome Kids Party Decorations and Kids Birthday Invitations.  i’m also kinda pumped about their Christmas Card collection too!

i used the larger die cuts to make banners…
DSC_0079 copy

and the smaller die cuts as toppers to dress up the simple vanilla cupcakes with gold sprinkles:

DSC_0477 copy copy

i used the Numbers and Pinstripes Theme, and you can see how unique and creative you can get by starting with their templates.  i love things like that…they do the hard, initial legwork, but i get to make it my own!

i also ordered some personalized napkins, even though they technically fall under the wedding decor category, because i kinda fell in love with how the design turned out.  and since i didn’t need plates because all we were serving was cupcakes, i thought it would be fun to have a unique napkin instead!
DSC_0170 copy

i had already created her invitation on Paperless Post so that i could email it out, otherwise i would’ve looked at using one off Pear Tree Greetings, because they have some really adorable ones.  but i did have Paperless Post send me one printed copy so that i could have it as a memory for her.

DSC_0181

this was one of my favorite projects for her party.  i’ve really been enjoying chalkboard art lately, so i knew that i wanted to incorporate this into her party.  i made that gold framed chalkboard years ago, and knew that it would work perfectly to make some chalkboard art all about the Birthday Girl.  DSC_0111 copy

i’ll come back and show you a tutorial for the chalkboard art, because its actually really easy!DSC_0106 - Version 2 copy

i found some gold striped washi tape in the Dollar Stop at Target (best decision Target ever made…i pretty much want to buy everything in there.)  i had to find something to use it for, so i taped some of my favorite photos of Berk onto our bulletin board.DSC_0052

the cake was another fun project because it gave me the chance to learn how to use buttercream frosting to do the petal technique.  super super super easy, and something that i’ll totally try again!!!  i used this tutorial from Wilton.  DSC_0496 - Version 2 copy

i looked everywhere for a gold “1” candle, but couldn’t find anything, so i bought a regular “1” (the kind they sell at the grocery store) and made my own with lots of glue…and lots of gold glitter.
DSC_0149 - Version 2 copy

i think the Birthday Girl enjoyed all her celebrations!
DSC_0127 copy

and i’ll leave you with some more pictures, just for fun:DSC_0015 copy

DSC_0015 copy - Version 2 copy

it rained either during or right before every party attempt…doesn’t that mean good luck?  just kidding.  i think it just means that its summer in Florida…DSC_0471 copy

DSC_0512

Berkeley actually wasn’t that fond of her cake, much to her older siblings’ dismay!  but momma ain’t complaining about that!  

DSC_0557 copythere you have it.  very glad that the never-ending party is now over!  but for sure enjoying our big One Year Old.  i forgot how much fun this age is!!

11 Comments

Sep

03

Easy Car Seat Cover Tutorial

i love y’all.  i really do.  you sure know how to make a girl feel like she’s not crazy!!  THANK YOU for your comments, emails, etc from my last post.  thanks for your encouraging words.  thanks for sticking in here with me.  my favorite thing about this blog is that it reminds me all the time that WE ARE NOT ALONE!!  this is truly an amazing, God-given community.

i’m excited for what i’m going to show you today, because i used this thing EVERYDAY for the first 6 months of Berkeley’s life.  its a sewing tutorial for an Easy Car Seat Cover.

DSC_0048 title

i made this a long time ago for Berkeley, but i never got around to posting it.  so i’m excited to share it with you today!  this is such a fun way to gussy up a boring old carseat, but its also super functional, because it provides shade, as well as protection from the elements.  i originally sewed it for Baby B’s car seat because i needed something to keep her dry during all those (sometimes daily) Florida afternoon thunderstorms.  i also used it to easily cover her up for those times when i didn’t want anyone getting close to her or touching her (especially for those early weeks!)  it was also great on walks to shield the sun.  Berkeley hated having the sun in her eyes, so this way i always had an easy, yet cool and breathable way of covering her.  and it provided instant shade when on the sidelines of her brother’s games too!  this not only proved to be amazing at all of those things, but i also got comments all the time on how cute it looked.

(can’t believe she’s already outgrown this thing now!  time flies…)

so here you go…this would make an amazing gift too!!  trust me…as a mom, anything that is not only functional but also super cute and can get daily use is the best kind of baby gift!

DSC_0049 copy

all you need is:
– 1 yard of front fabric (the floral…i think it was either a Heather Bailey or Amy Butler design…but i can’t remember for sure.  i bought it at my favorite local quilting shop)
– 1 yard of back fabric (the grey polka dot….i found this one at Joann’s)
– 1/4 yard of fabric for the straps (i used the polka dot for the straps too)
– (2) 3 inch strips of velcro
– 4 1/2 yards of jumbo ric rac
– coordinating thread

(i would suggest washing your fabric before you begin.  i ended up needing to wash this cover many many times, so if you prewash your fabric, it will do all the shrinking its gonna do before you sew it and wash it later, only to find out that it now won’t fit your carseat!  so i would suggest first machine washing and then air drying your fabric)

DSC_0960

lay out your front fabric and, using a bowl, round your corners: DSC_0966 copy

DSC_0967 copy

once all 4 corners have been rounded, repeat on your back fabric:

DSC_0968

lay your back fabric out, right side up, and then lay the ric rac all the way around, making sure that the edge of your fabric is lined up with the outer edge of your ric rac.  in other words, the ric rac should be laying just inside the fabric, with the edges on top of each other:
DSC_0973 copy

sew the ric rac onto the fabric by sewing down the middle of the ric rac.  (make sure you are catching the fabric as you sew):DSC_0978

next, pin the front fabric onto the back fabric, right sides together, with the ric rac sandwiched in between the fabric layers:DSC_0984 copy

using the already sewn line as your guide, sew on top of that same line to attach the front and back pieces of fabric together.  leave a small opening so you can flip it right side out when done (you will close that opening in a minute with a top stitch):

DSC_0993 copy

flip right side out, and then pull the ric rac out from the edge and iron down so it stays in place:
DSC_1000 copy

next, top stitch all the way around.  this will help the ric rac to stay in place, and also adds a finished touch (you can close your opening at this time too.  just tuck in your edges and sew together with your top stitch:DSC_1010

the main part of the cover is now done (see how easy that was?!), so now all you have to do is make the straps so it can hang over the carseat.  so cut two pieces of fabric (i used that same back fabric to give it a coordinating look since it was going to be attached to the front fabric.)  cut two squares, about 8 x 10 inches.

DSC_1011 copy

fold them right sides together, lengthwise, cutting the width in half (so you’ll end up with 2 pieces that are 4×10), and pin the edges.

DSC_1012 copy

sew all 3 sides together, but leave an opening to flip right side out.  once you’ve flipped the fabric, sew a top stitch all the way around, sealing up the opening.
DSC_1014 copy

then you need to sew your velcro pieces onto each strap.  you can see approximately how i did that below, but the best thing to do is to position the strap around the handle of the car seat so you know how your strap is going to be folded and which side your velcro will need to go on.  (this will make sense as you do it.)  pin each piece of the velcro where you need it for the strap to hang on the handle, and then sew in place.  DSC_1017 copy

your final step is to attach the straps to the cover.  the best way i found to do this is to velcro the straps to your handle then actually throw the cover over the carseat and position it how you’d like it to hang (i wanted my fabric to  completely cover the front and the back of the carseat, which meant there was going to be more fabric in the front, so your straps won’t be completely in the center).  also…i didn’t want any fabric hanging in the middle, touching Berkeley’s head, so i made sure to position the straps towards the outside so that it pulled the fabric taunt.  sorry that there is no better technical way of telling you how to measure and hang, but it depends on your car seat and the handle.   once you figure out where you want your straps, pin them on, and sew them onto the cover in a 3 x 3 inch box to give the straps lots of stability and to allow the cover to hang the way its supposed to hang.  (once again, this will make sense as you do it.)

DSC_0056

there you have it!  its a really quick and easy project, but makes a huge difference, both in functionality (is that a word?) and style :)

DSC_0062 copy

you’ll notice that i also made a coordinating arm cushion for the handle.  that thing was a life saver, as it cushioned the crook of my poor arm from all the weight from lugging that car seat in and out of the car.  i’ll show you that tutorial another day if you are interested!

happy sewing,


12 Comments