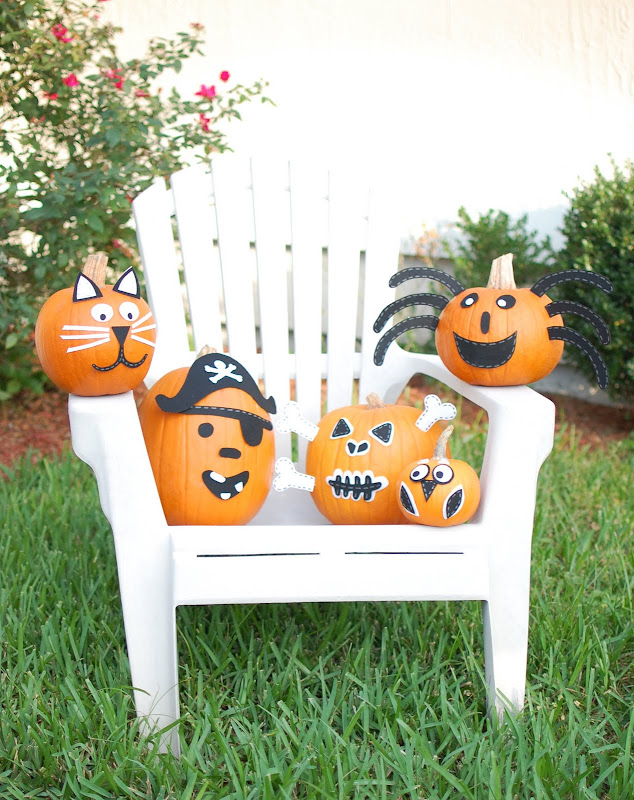
our Crew of Creatures
hello friends!
remember from here when i told you to check back to see what we were planning to do with our pumpkins this year??
well…here’s what we did:
we thought that if we didn’t carve our pumpkins this year, then they might last long enough to use as decoration for Thanksgiving too. and plus, cleaning out those pumpkins to prepare them for carving always makes me gag big time!! so when i found this idea, i figured it would be perfect!
a few years ago, Pottery Barn Kids sold a kit with all of these pieces to decorate your pumpkins. but i found the idea to create our own on this cute site. i used some of her templates, and created a few of my own templates (keep reading to see them), and now we have the cutest little pumpkin friends sitting on our front porch! the kiddos think they are just as fun as a real carved pumpkin, and beg me to bring them inside every night so that the neighborhood “pumpkin smashers” don’t ruin them!
so in case you want to try it, here’s the how to:
i created my own cat and owl template to share with you! i’m not sure how to scan it in and link you to it, so for now, just click on this picture below and print it. however, in the print page, change the page orientation so that it prints landscape, and enlarge to 121%…at least that’s what works on my computer! basically, whatever makes it fit as close to a full page as you can get it will give you the proper sizing.

 finish this process for all your pieces, paying attention to the number of pieces you need for each.
a few tips:
– on the pieces that are sticking into the pumpkin, such as the pirate hat or bones, i DID NOT cut a front and a back for each, as her template says. in other words, i just cut one piece each for the front and did not sandwich the toothpick in between (see below). it worked just as well to just use the front without sandwiching it with the back, and it saved time and felt. you’ll see what i mean once you get started.
– for the spider legs: cut 3 legs but then cut the other 3 legs in the mirror image of the first ones, since they will be sticking out of opposite sides of the pumpkin.
here are the details up close:

 (i added the white in the eyes to give them a bit more dimension)
 and here are our two that we created:

 we might add in a few more friends if we find the time, but for now, we are enjoying our little crew of creatures!
 the only downside to this project is that i now don’t have any pumpkin seeds to roast! which is a bummer, cause i’ve got a great recipe for them, and i’m really gonna miss having them around this year. does anyone know if you can buy raw pumpkin seeds anywhere??? i’d LOVE to know!
 the only downside to this project is that i now don’t have any pumpkin seeds to roast! which is a bummer, cause i’ve got a great recipe for them, and i’m really gonna miss having them around this year. does anyone know if you can buy raw pumpkin seeds anywhere??? i’d LOVE to know!
still have a Halloween recipe coming, if i can get my act together, so check back!
off to watch “Its the Great Pumpkin, Charlie Brown” with the kiddos, and then heading out in the morning for the big school Halloween Parade and party!
loving all the festivities that this season brings,


 Follow


