May
27

i have no idea what i’m talking about!
i am hesitating BIG TIME to write this post, cause i seriously have no clue what i’m talking about! there are many many educated and talented people who should be answering these questions, and i am not one of them (not even close!) but since some of you asked about my camera settings and how i capture certain pictures, and i really want you all to know that i take seriously any question or comment you send my way, i figured i’d go and play around a bit to see if i could explain a little more about how i shoot.
see…i NEED people to give me the basics in ways that i can understand, so i’ll try to regurgitate to you some things i’ve been learning. but NOT because i know what i’m doing…but simply b/c i know some of you are like me and are wanting to learn everything they can, so i see this post kinda like A+ notes in college (did you have those on your campuses? where you can buy the notes that someone else took from any class you want??) basically…i’m just taking the notes for you from what i’ve read, and giving them to you…doesn’t necessarily mean i understand it myself or even have the talent necessary to use it all!!
so i kinda feel like i’m diving into the deep end and i don’t know how to swim, but here goes:
laetly, cause i’m dying to learn, i’ve tried playing around with different settings on my camera, and have been reading like crazy, trying to teach this old gal some new tricks. wish i had the money to take a cool class, but i think at this point i’d rather save it for a cool lens! but go do some googling…you might be pleasantly surprised at the wealth of resources for free on the internet! the local library has helped me out too with some books on photography.
so all this info has been self taught from research (and lots of questions to my dad), which means….there is a GOOD GOOD chance that i’ve misinterpreted it, and that i’ve got this whole thing screwed up! it also means that i’ll probably mess up the “professional” terms quite a bit, so i’ll just try to explain in everyday, mommy terms.
but again…i really don’t have a clue what i’m talking about! so all you professionals out there…laugh away!!
first off:
APERTURE
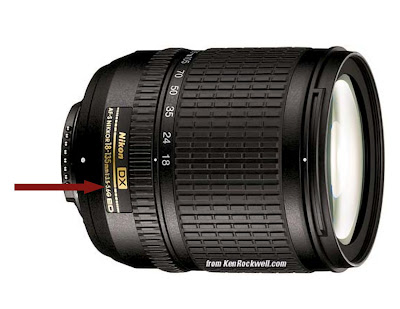
when the aperture is wide open (small/low F-stop number) it lets more light into the camera, and creates more shallow depth of field (blurry background, sharper forefront image). the aperture settings are determined by the lens that you use. the arrow in the following picture is pointing to the place on my lens that tells the lowest aperture settings available for that lens (3.5-5.6). for mine, at 18mm, my widest aperture setting is 3.5 and when zoomed out to 135mm, my widest aperture setting is 5.6. go check your lenses and see what they say, then you’ll know your widest aperture settings too. this is also why i am in the market for another lens. 3.5 is the widest aperture available on my lens, which i think is good, but i’d love something wider. (not too sure what the widest available aperture setting is…i’ve seen lenses that are 1.2…)

but…there’s more than just aperture. aperature and shutter speed work together (along with a bunch of other stuff…)
so:
SHUTTER SPEED
a fast shutter speed (speed at which the shutter clicks…you hear it when you take a photo) lets in less light and a slow shutter speed lets in more light.
let me explain the way i understand it: a short click (fast shutter speed) will let in less light light, cause the shutter stays open for a short amount of time, versus a long click (slow shutter speed), which lets in more light, cause the shutter stays open longer.
in the right lighting and with the right settings, a fast shutter speed freezes action. a slow shutter speed creates blurred action.
so…if you take a picture with a wide aperture (lots of light coming in) with a slow shutter speed (also lots of light coming in), then you’ll get a washed out or overexposed picture, cause there’s too much light. same idea with a closed aperture (larger F stop number) and a fast shutter speed…not enough light gets in so your picture will be too dark. go try it out…you’ll see for yourself!!
so i think that means that if you have a wide aperture (small F stop number) then you want a faster shutter speed (like 1/500th of a second), and if you have a closed aperture (larger F stop number) then you want a slower shutter speed (like 1/50th of a second).
shutter speeds are measured in fractions of a second. the time it takes from when the shutter opens to when the shutter closes…directly affecting how much light is let in. a shutter speed of 200 means its 1/200 th of a second. so 500 is 1/500 th of a second, etc…
don’t know why or how all of this stuff works, but it just does!! (my dad says there are mathematical formulas to figure all that out, but there is not room in my brain for that kind of stuff!)
there is one more setting that’s kinda important too…that’s ISO. some people call the following the photographic triangle, i guess cause they all work together:
Aperture
Shutter Speed
ISO
again…not sure of the science and math behind these 3, but i’ll go ahead and try to explain ISO too, since i’m already in this deep!
ISO:
still kinda confuses me, i’ll be honest. but i read somewhere once (don’t remember where) that you can think of ISO like having worker bees in your camera. if your ISO is set at 100, then you have 100 worker bees, and at 200, then 200 worker bees, etc…whose job it is to gather light that comes through the lens and make an image. it works along with shutter speed and aperture, because it affects the amount of light coming in. if i have my ISO set to 100 and you have your’s at 200 (on the same aperture setting) then i’ll need a longer exposure time, more light (longer click, slower shutter speed) then you will, b/c you have more worker bees gathering light for you. okay…i think i just confused myself!!
right now, i pretty much just follow these guideline for ISO settings that i found here :
– on a sunny day, set your ISO low, like at 200.
– on a cloudy day, set it a bit higher, at like 400.
– if you’re inside, and its dimly lit, or you aren’t using a flash, or its evening, set it at 800 or higher.
basically, in poor lighting, use a high ISO, and in bright lighting use a low ISO.
key to note: the higher your ISO, the more chance you’ll get grain in your photos (ie: less quality, less sharp…not really blurry, but grainy…get it?) sometimes not too big of a deal, and can even kinda look cool…but just know, that’s a result of high high ISO.
(ps: if you don’t know how to set the aperture, shutter speed, and ISO on your camera, read your manuel and it should tell you, cause every camera is probably a bit different, or go to my BFF: www.google.com. but reading my manuel has helped me a ton, along with just playing around with my camera!
there are other factors, such as white balance, etc. that make a difference in photos, but i’ve already talked WAY too much about things i don’t know, so i’ll leave it at that.
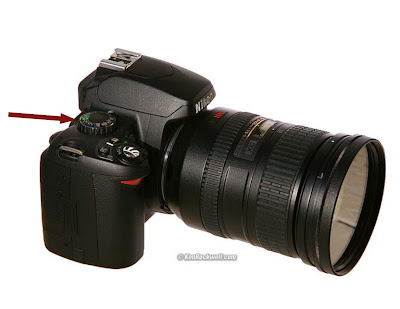
so…if you are like me, all you want to know is how to capture the kind of pictures that you see and know that you like. one thing that is helping me learn is that i’ve stopped taking photos in auto setting only. now auto setting is still great and i still use it like crazy (like at Disney, where the lighting and places were constantly changing, and i just wanted to capture quick shots, therefore giving me no time to sit and figure out what to set my camera to!) but if i can, i’ll usually now shoot in Aperture Priority or Manual (ps: NOT manual focus…just manual setting). again…go look in your manual for this, but usually these settings are on the dial on the top of your camera, like here on my D40:

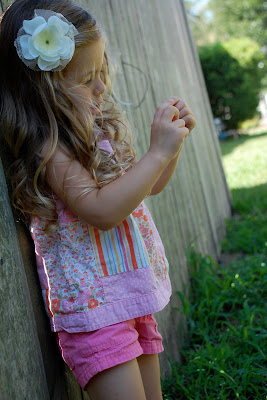
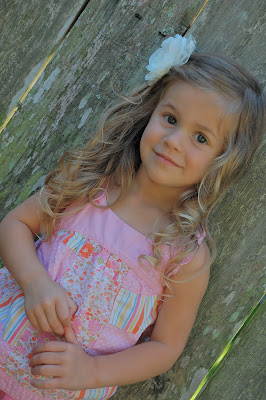
so i took bella bug out in the backyard this morning and bribed her to be my model (Nemo fruit snacks, anyone??) it was around 10:30 am, and i tried to find the shadiest spot in my backyard. i’m learning that shooting outdoors has a lot to do with timing it right with the sun.
she cooperated for all of 1 minute, and i was able to quickly capture a few shots on different settings. so here’s my attempt to show you a little bit more about shallow depth of field, or the blurry background, and how some simple settings on your camera can help. there are many other factors involved in getting a good pic…most of which i don’t really understand and can’t seem to figure out how to control yet, but today i’ll just give you an example of a pic taken with a wider aperture setting, and one taken with a more closed aperture, and the difference the two makes.
so basically, i took this following picture in Aperture Priority mode, which basically means i set the aperture i want to use, and the camera sets the rest. (Shutter Priority mode is when you set the shutter speed and the camera sets the rest. Manual is when you set everything. there are other settings that in different situations i will use too…)
i did change my ISO to 400 since i was in the shade, but ended up keeping my white balance on auto.
fyi: these aren’t the best pictures! but take note of the shallow depth of field: the blurred background…the fence, grass, and the trees:
aperture: f/4.8
shutter speed: 1/250s

now notice how the background is in focus in this next one, same location:
aperture: f/11
shutter speed: 1/50s
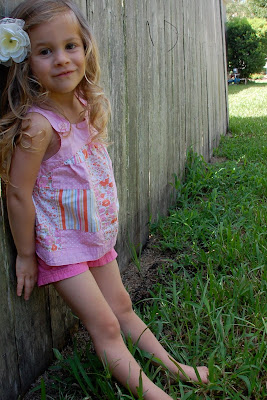 that’s a very poor example…but i had a 3 year old who wasn’t willing to carve anymore than 1 minute out of her busy schedule of sliding and swinging, and a mom who honestly has a lot to learn, so that’s as good as it gets for today!! but that gives you an idea of what i mean by shallow depth of field, and how simply changing a setting on your camera can affect a photo. i know some of you contacted me about wanting to know more about that and how to set your cameras to do that, so i hope that helps some (and i really hope the things i’ve tried to explain today are correct! i’m not making ANY promises, so don’t quote me!)
 that’s a very poor example…but i had a 3 year old who wasn’t willing to carve anymore than 1 minute out of her busy schedule of sliding and swinging, and a mom who honestly has a lot to learn, so that’s as good as it gets for today!! but that gives you an idea of what i mean by shallow depth of field, and how simply changing a setting on your camera can affect a photo. i know some of you contacted me about wanting to know more about that and how to set your cameras to do that, so i hope that helps some (and i really hope the things i’ve tried to explain today are correct! i’m not making ANY promises, so don’t quote me!)
and here’s an example of a pic that i love of my friends, the Brown family. but here’s where you’ll really see that i don’t know what the clue i’m doing. i was trying to have their sweet little girl in sharp focus, and them in the background, really blurred out. she’s kinda sharp, and they’re kinda blurred, but i have no idea how i get from this to what i was really going for! so basically, i’m realizing that i can read all i want and practice too, but sometimes, it just takes talent and knowledge that i don’t yet possess! if you know what i could’ve done differently, i’d welcome any tips??
Aperture: 4.8
Shutter Speed: 1/1000s
ISO 200

and i’ll leave you with 2 more shots, just for fun, to show you that in my opinion, the adorable subject(s) in the photo is what makes me love a photo (and not the talent, or lack there of, behind the lens!!)…photo above too, case in point!
taken in Aperture Priority mode:
Aperture: f/4.0
Shutter Speed: 1/320
 Aperture: f/5.0
Shutter Speed: 1/200
 that’s all i’ve got for today! gotta go break up a fight between the boy and the bug over a super annoying, loud keyboard.
 that’s all i’ve got for today! gotta go break up a fight between the boy and the bug over a super annoying, loud keyboard.
have fun playing with your cameras, and pass on to me all that you learn!!

 Follow
